vrijdag 13 december 2013

Learn to Crochet Tunisian Style: In the Round with Colour Changes


Missed a lesson? Here you can find the whole Tunisian crochet course!

Last week I showed you how to crochet in the round and make the left cozy. This week I am going to show you how to change colours and get a striped cozy!
This tutorial will be mostly the same as last week, but I will show you how to change yarns and how to deal with all those ends. If you want stripes of a single colour for the background and the vertical bars, make sure you have two balls of the same colour.

No ebook this time! This is a real tutorial.


 Pick colours that you like and look good together. I am going to use two colours in my stripes so I chose some colours form the  colour combination board on Pinterest. I am using Rowan cotton and a double ended hook size 6 mm. And a stitchmarker.


 Pick your glass jar for your cozy.


Make a chain that fits around your jar, sl st to close and be careful not to twist your stitches.


Mark your first stitch.


Pick up stitches like you would do for the foundation forward pass.
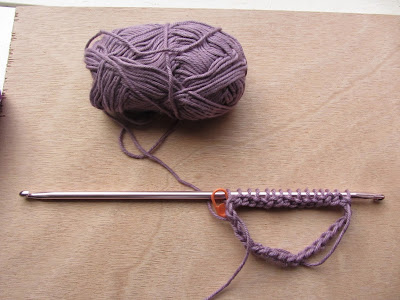


 If you have enough stitches on your needle, just flip it over and slide your work to the left, like you did last week!


Pick your colour for the return pass and pull through two loops.
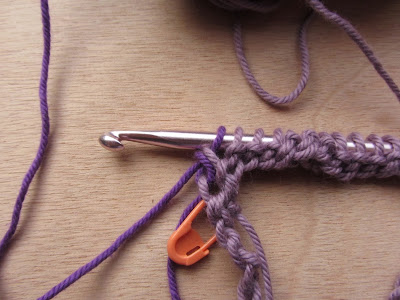
 

Like this


Keep repeating this step until you have about four stitches left.


Flip it over!


Slide to the left, and go about with a forward pass again!


With this cozy I used the Tunisian Simple Stitch again, so when I arrive at my first loop I insert my hook from right to left underneath the front vertical bar and happily pick up more loops. And I reposition my stitchmarker. Make a stripe as wide as you like. Just keep on working those loops on your hook and off your hook.


But! I want to change colours. So I stop before my first stitch of the round I just made.


Pick two (or one, if you are making single colour stripes, make sure you have two balls of that colour).


Insert your hook in the first stitch, wrap your yarn over your hook for the forward pass in your new colour and pick up a loop.


Continue picking up loops with your new colour until you have enough stitches on your hook.


If you flip your work over to start a return pass, you need to change your colour in this pass as well. Finish your last two loops of your old forward pass colour.


Wrap your new return pass colour and pull through those two loops.


Now you can go on and make your return passes with your new colour!


Go on like this, make more stripes if you want to! The only downside is that you will have a shift in colours, the same as you would have with making a striped tube with single crochet stitches. I really do not know any solution for this, sorry!


To make your last finishing round you need to stop again in the stitch before your first stitch of that round. On the return pass keep working your loops off the hook until you have one loop left.

With your forward pass colour start making slip stitches along the round for the closing round and putting your hook into the stitches the TSS way. This method actually works better than the method I showed you last week!


And voila! Done! Enjoy your cozy!

Leer Tunisch Haken: In het Rond met Meer Kleuren


Lessen gemist? Hier kun je alles over Tunisch haken terugvinden!

Vorige week liet ik je zien hoe je in het rond Tunisch kon haken. Toen heb ik laten zien hoe je de linker pot cozy kon maken. Wat ik je deze week wil laten zien is hoe je tijdens je project kunt wisselen van kleur!
In principe zullen veel dingen hetzelfde zijn als vorige keer, maar het wisselen zelf zal ik proberen te verduidelijken. Als je strepen van 1 kleur wilt zul je voor iedere streep twee bollen van dezelfde kleur moeten gebruiken, maar de stappen om te wisselen zullen hetzelfde zijn.
Geen ebook dit keer, want het is echt een tutorial deze keer :)


 Kies een aantal kleuren die bij elkaar passen. Ik heb een bord met kleurpaletten op mijn Pinterest staan, en daar heb ik kleurpalet uitgekozen. Ik gebruik Rowan cotton en een tweezijdige haaknaald van 6 mm.


 En natuurlijk een pot waar de cozy om heen moet.


Maak een ketting van lossen die past om de pot.


Sluit deze en  markeer je lus op je naald als eerste steek.


Neem steken op zoals je zou doen bij een algemene heengaande toer.


 Heb je er genoeg, dan draai je je naald om en schuif je je werk naar links weet je nog?


Hecht dezelfde kleur of een andere kleur aan.


En begin een teruggaande toer.


Heb je ongeveer 4 steken over, dan draai je je naald weer om en ga je verder met je heengaande toer. Ga zo verder in een spiraal (zie ook hier) tot je een streep hebt van de juiste/gewenste dikte.


Bij deze cozy gebruikte ik weer de Gewone Tunische Steek dus bij de eerste steek stopte ik mijn naald achter de voorste lus langs en ging ik vrolijk verder met in het rond haken!


Maar! Nu wilde ik van kleur veranderen. Stop bij de eerste steek. Werk nog niet in een lus/draad/steek.


Kies twee (of 1 als je je strepen in 1 kleur maakt!) nieuwe kleuren. Eentje voor de heengaande toer en eentje voor de teruggaande toer.


Steek je naald in de eerste steek achter de verticale draad, maak een omslag met de nieuwe kleur en neem een lus op. Laat de oude kleur hangen (knip af tot een einde van ongeveer 15 cm.


Neem de lussen op en verplaats je stekenmarkeerder naar de eerste steek (de eerste lus van de nieuwe kleur).


Op de teruggaande toer moet je natuurlijk ook nog je kleur veranderen. Als je weer je werk hebt omgedraaid zorg je eerst dat je alle lussen van je oude eerste kleur hebt afgewerkt met de oude tweede kleur. Houd 1 lus oude kleur over.


Maak een omslag met je tweede nieuwe kleur (of dezelde kleur als je voor je heengaande toer hebt gebruikt).


Haal door twee lussen en ga zo door met je teruggaande toer tot je weer iets van 4 steken over hebt. Draai je werk weer om en ga dan door met de heengaande toer.

Op deze manier kun je dus strepen maken!


Het enige nadeel is dat je hetzelfde krijgt als je een spiraal maakt met alleen maar vasten: de kleur verschuift. Ik heb daar helaas geen oplossing voor!


Om de laatste afsluitende toer te doen zorg je ervoor dat je stopt met de heengaande toer voor de eerste steek van je toer, en 1 lus overhoudt na de terugaande toer.


Haal de kleur die je voor de verticale draden hebt gebruikt door je eerste steek (steek je naald in zoals je bij een Gewone Tunische steek zou doen) en lus en maak een afsluitende ronde door halve vasten door alle verticale draden te maken. Deze methode werkt eigenlijk beter dan die van vorige week!


En klaar! Draadje afhechten, wegstoppen en de cozy is gebruiksklaar!


donderdag 12 december 2013

Busy Fingers Showing Off!! # 26

Quite a bit of lovely projects were linked up last week!!

Here is the top 3 most-clicked-links:

Number 1

 
Cute happy new year's card @ Moois van M(i)e

Number 2

 "Fat" Monkey @ Rianneshaaksels

Number 3

 
Girlie pillow cover @ Renate's haken enzo 


Thank you so much for linking up! I will feature you both on Facebook,  Pinterest and @zomaareendag!
 Want to get featured too? Please join the new party! Please be aware that if you post your url you really need to post the BLOG POST url, not your website url!!!

Here is the new Link Party, I would love to see if you have tried any Tunisian projects! I've noticed on another blog that you do not necessarily have to have a blog, you can also link up pictures from Photobucket!

Dank jullie wel voor het meedoen. Ik zal jullie projectjes op mijn Facebookpagina, Pinterest  and @zomaareendag!

Wil je meedoen? Leuk! Post je blog post link in de Link up hier beneden, let er op dat je niet je Website URL kiest, want dan kan ik je post niet vinden.
Ik zou het leuk vinden als er lezers zijn die zich gewaagd hebben aan de Tunische projectjes hun maaksels showen. Ik heb op een andere blog gezien dat je niet per se een blog hoeft te hebben om mee te doen, je kunt ook foto's linken bijv via Photobucket!

Doe vooral mee met de Party! 


woensdag 11 december 2013

Baby, It's Cold Outside


We had our first real night of frost. I heard Big Man scraping the ice of the car windows this morning! It seems to me the light has changed the last week. The sun has dropped quite a bit in comparison to the horizon and the light is cooler and more crisp. Although a bit annoying when you are blinded by the light whilst biking, it looks beautiful on the water in the canals and the naked trees....
Winter is definately coming...

Afgelopen nacht was de eerste nacht hier met temperaturen onder de nul. Ik hoorde een hoop gekrab van de Grote Man terwijl hij de ramen van de auto onder handen nam. De zon is een heel stuk lager aan de horizon gaan staan en het licht is nu zoveel helderder en koeler. Het is nu wel dat je met toegeknepen ogen moet fietsen vanwege de zon, maar o wat is het winterzonlicht mooi aan het vallen op alle sloten, vijvers en kale bomen...
De winter is onvermijdelijk in aantocht...