zaterdag 28 februari 2015

Busy Fingers Showing Off!! #82

Een hele goedemiddag vanuit een zonnig Zoetermeer! De kids spelen buiten, en ik spring strakjes op de fiets, want het ziet er zo prachtig uit! De voorjaarsvakantie is nu helaas voorbij en ik zit hier alweer met lijstjes voor mijn neus en planningen voor de komende weken op school... Het gewone leven gaat weer beginnen....

Maar eerst natuurlijk de Link Party! Wie kregen de meeste kliks vorige week? Er was zoveel aan haaksels in de Party aanwezig!

Hello my lovely readers from a very Sunny Zoetermeer! The kids are playing outside and I am hopping on my bike in a short while for some errands, it is such great weather outside! Spring Holiday is almost over, so I am sitting here with a table covered in books, notes and preparations for the upcoming weeks for school.... Work life is going to start on Monday!

But first things first: The Link party! Who got the most clicks last week? There were lots of crochet entries in the Party! It was so nice to see all of you!


Number 1


And she shows how to change colour after each round.


Number 2


Daphne made tea towels for her Carnaval outfit and shares the pattern for both of them HERE!

Number 3


Hilde made this cute bag with grannies and she shares the pattern with us. Beautiful bag Hilde!


En wat zijn jullie deze week aan het doen? Laat het zien!
De meest aangeklikte projecten zet ik in het zonnetje op Facebook en op Pinterest!
Hoe meer zielen hoe meer vreugd, deel deze link party alsjeblieft!
                                             ~ Volg me op Facebook - Twitter - Instagram ~


Please share your links in the new party, I would love to see your creative designs!

 If you get the most clicks I feature you on Facebook and Pinterest.
Don't forget to share, the more link ups, the merrier the party will be.
~ Follow me on Facebook - Twitter - Instagram ~

vrijdag 27 februari 2015

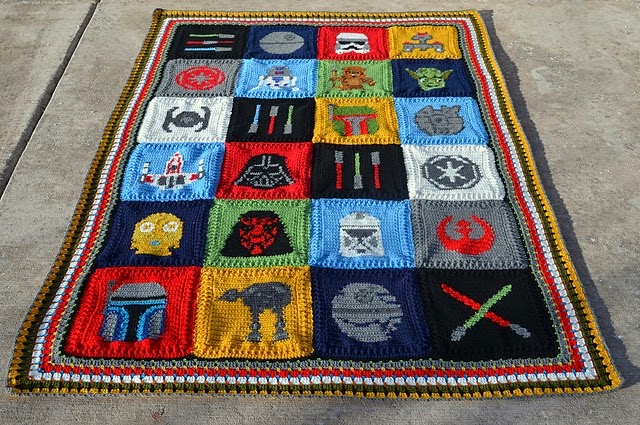
Friday Find! May the force be with you..


Ik heb een zwak voor nerd-achtige patronen. Iets dat verwijst naar een film, of iets met wiskunde of natuurkunde bijvoorbeeld. Mijn hart maakt dan een sprongetje! Ik denk dat ik een beetje geek aanleg heb dankzij mijn man die een enorme gamer/geek/nerd is. Ik vind het helemaal niet erg :)

Ik vind deze Star Wars deken echt helemaal geweldig!! Dit patroon is net nieuw in de Ravelry database gezet. Je maakt het met telpatronen net zoals bij borduren. De plaatjes en technieken zijn allemaal HIER te vinden!

Fijne vrijdag!

Xx
Barbara

~~~~~~~~~~~

I have a soft spot for nerdy stuff, and nerdy patterns. Something with a hint to a movie or maths or physics, I love it. It makes my heart skip a beat and put a smile on my face! I think this was triggered by marrying my gamer/geek/nerd husband, but I really do not mind it at all :)

I just saw this Star Wars inspired blanket popping up in the Ravelry database and I love it! You can make this with charts just as you do with cross stitch. All graph charts and techniques are explained HERE.

Have a great Friday!

Xx
Barbara

woensdag 25 februari 2015

Pattern: Easy-as-pie Fingerless Mitts / Supermakkelijke vingerloze wanten


Voor een beginner is het soms lastig in te schatten of een patroon haalbaar is of niet. Soms kom je er gaandeweg achter of een patroon te moeilijk is! Speciaal voor jullie een patroon dat je echt kunt doen als je net de steken geleerd hebt (beloofd!). Het patroon gebruikt alleen halve vasten, vasten en stokjes.

Nodig: Haaknaald 4 mm en een garen geschikt voor haaknaald 4 (ik gebruikte Royal van de Zeeman)

Haak een ketting van 30 lossen of een ander even aantal lossen

Toer 1: Haak een vaste in de 2e losse vanaf je naald, en in elke losse daarna (dan heb je een oneven aantal vasten)

Toer 2: Haak 1 keerlosse, *vaste in eerste steek, stokje in volgende steek*, herhaal tot de laatste steek, en in de laatste steek van de toer maak je een vaste

Toer 3: Haak 1 keerlosse, vaste in elke vaste, stokje in elk stokje, eindig de toer met een vaste in de laatste vaste.

Herhaal toer 3 tot je een lapje hebt dat met rek (de toeren leg je verticaal en lopen dus van vinger tot pols) helemaal om het breedste gedeelte van je hand past. Ik maakte  21 toeren in totaal (dus toer 2 meegerekend) en ik heb smalle handen en polsen.

Hecht af.

Leg eerste toer en laatste toer op elkaar. Markeer het duimgat en haak met een halve vaste door beide steken van begintoer en eindtoer de delen die dicht moeten vast.

Hecht af en maak een tweede want.

Veel plezier met het patroon!

~ Volg me op Facebook - Twitter - Instagram ~

~~~~~~

It is sometimes difficult for a beginner to see if a pattern is up your alley or not. As a beginner you do not want to start something too difficult. Just something nice and easy. This one's is easy (promise!)! It only uses single crochet, double crochet and slip stitches.

You'll need: Crochet hook size 4.00 mm or G and a light worsted weight yarn (I used an acrylic yarn)

Make a chain of 30 chain stitches or any even number of chain stitches

Row 1: Make a turning chain, single crochet in the 2nd ch from your hook, and in each ch st (you should have an odd number of single crochets at the end of row 1)

Row2: Turn, chain 1, *single crochet in first stitch, double crochet in next stitch*, repeat between ** until last stitch, single crochet in last stitch

Row 3: Turn, chain 1, * single crochet in each single crochet, double crochet in each double crochet*, repeat for the whole row, single crochet in last stitch.

Repeat row 3 until you have a piece that will fit around the widest part of your hands with the rows vertical and first row against last row. I have very small hands and wrists and I made 21 rows in total (including row 2)

When done, place first row and last row on top of eachother, mark an opening for your thumb. Slip stitch the other stitches shut by slip stitching through both loops of the stitches of first and last row.

Fasten off.

Weave in all ends and start your second mitt.


Have fun with the pattern!

~ Follow me on Facebook - Twitter - Instagram ~

dinsdag 24 februari 2015

For The Birds


Het is genieten in de tuin! Sinds we de voederpaal hebben is het af en aan vliegen en twetteren van vogeltjes. Het blijkt dat we een grote groep vogeltjes als dagelijkse bezoekers hebben. Een dominant mezenmannetje dat denkt dat de voedersilo van hem alleen is, twee koppeltjes appelvinken, twee musjes, een schaapachtige houtduif, een verlegen koppeltje merels, hyperactieve pimpelmeesjes en roodborstjes die we eerst maar 1x in de winter zagen, maar nu dagelijks een aantal keer.

Het liefst zou ik de hele dag naar ze willen kijken vanaf de bank, maar tsja dat gaat natuurlijk niet. Ik geniet als ik 's ochtends zit met mijn bakkie, dat in ieder geval.

En dus dacht ik, die schatjes moeten op de foto. Die kleintjes zijn zo snel! Maar nu lukte het. Veel geduld, de camera (met telelens) maar op een driepoot gezet en tadaa, een aantal geslaagde portretjes


Fijne dinsdag en geniet van de foto's!


~~~~~~~~~~~~~~

It is such a joy to sit down every free morning with my cup of coffee. We've put a feeding pole into the garder for about two months and since it is in place birds are flying on and off multiple times a day. Walking birds are pottering around on the ground and hop on and off on the feeding bowl I've put down for them. It is so cute to see them, and to really see their behaviour! It is a whole family of birds that are residents in our garden apparantly. One dominant Black Tit with his little wifey, a sheepish dove, two hyperactive Blue Tits, mr. and mrs Blackbird who are very shy, mr. and mrs Robin Redbreast who look a like so much and a few hopping finches.

I would love to sit down a whole day and just study them and enjoy them fluttering, flying and hopping, but you know, so much to do!

But I decided I really want to make pictures of them. I knew it would not be easy since they are so fast and only really active in the mornings. But with a high shutter speed, my tele lens and a tripod I think I did a great job.

Have a great Tuesday and enjoy the pictures!

maandag 23 februari 2015

~ Monday Music ~

Last week hubby and I watched a Fleetwood Mac documentary, and I was amazed at how much fighting there was between the couples in the band. Amazed! It was crazy intense I think during those final years.

Here is their best song in my eyes.


zondag 22 februari 2015

Soothing Sunday


Jongens, heel heel erg bedankt voor alle beterschapswensen, wat lief van jullie!
Hier gaat het een tikkeltje beter. Geert heeft nog enorme rode wangen, maar begint alweer te huppelen. Ik heb nog een dichtgeknepen keel en heb dus mijn vent en mezelf wakker gehouden met gesnurk. Heerlijk! Ik hoop dat ik vannacht wat beter slaap.
Maar! Het is nu wel echt voorjaarsvakantie dus hup griep, ga weg! Ik hoop vandaag een patroon af te schrijven dat al weken bijna-klaar-om-te-testen is, maar iedere keer uitstel (ook nu, want ik schrijf deze blogpost haha)..
En ik geniet even van de rust. Ik geniet even van de stilte, van pruttende kinderen en strakjes een haakwerkje oppakken. Ik kwam er achter dat de opzet van een vest totaal niet klopte dus die mag ik vrolijk gaan uithalen helemaal. Grrrrr...

Ik wens jullie een fijne zondag!

~~~~~

I want to thank you for all your get-well wishes, thank you so much, it was really sweet to read them!
We are on the mend I think. Geert is sleeping now and has rosy cheeks that won't go away, but he was hopping around the house a bit already so my hopes is that he is okay by tomorrow. Both my ears are plugged and my throat feels clenched so I kept both myself and my hubby awake with fierce snoring.
But! It is the start of the spring holiday so flu, go away! I hope to finish a pattern today that has been lingering in an almost-ready-for-testing phase way too long. I am going to add those last few rows and get it done!
And I am going to enjoy the quietness of the spring holidays. No early rising, no school runs, a little bit of playing and a little bit of crochet each day..
But first things first: I need to rip out my whole cardi-in-the-making. Boo.

Wishing you a splendid Sunday!

zaterdag 21 februari 2015

Busy Fingers Showing Off!! #81

Man o man, het is hier een ziekenboeg... Manlief heeft net twee dagen in bed geleden, Geert ligt nu te slapen en ik voel me ook niet al te best met keelpijn en snotteren. Laatste ronde griep is nu begonnen toch?

Ik wens jullie een heel fijn weekend, hier is de top 3 meest aangeklikte links:

Dear o dear, it is a sick bay over here.... My dear hubby just spend two days in bed, Geert is coughing and sleeping at the moment and I am not feeling to good at the moment... I hope this will be the last bout of the flu in this house!

I wish you a great weekend and here is the top 3 most clicked links:

Number 1


Renate started the CAL 2015 which is designed by Terray's leven and Jolanda's scrapsels but she is going to make a pillow cover with it instead of a blanket. Beautiful colours and great idea!


Number 2


Hilde crocheted a chunky gift and I just love the powdery colour! The pattern is from EchtStudio and it's free. Read all about it!


 Number 3


And another CAL 2015 blanket in the making! I adore the blues chosen for this square... Read more over here!

Ik zou zeggen, laat vooral zien waar je deze week mee bezig bent. Ik ben nieuwsgierig!

De meest aangeklikte projecten zet ik in het zonnetje op Facebook en op Pinterest!
Hoe meer zielen hoe meer vreugd, deel deze link party alsjeblieft!
                                             ~ Volg me op Facebook - Twitter - Instagram ~


Please share your links in the new party, I would love to see your creative designs!

 If you get the most clicks I feature you on Facebook and Pinterest.
Don't forget to share, the more link ups, the merrier the party will be.
~ Follow me on Facebook - Twitter - Instagram ~

vrijdag 20 februari 2015

Friday Find! Flower Looming


Ik blijf maar praten over die workshops, maar er gebeurt zo veel leuks in mijn plaatselijke wolwinkeltje!

Afgelopen zaterdag, terwijl ik bezig was met mijn deelneemster in de gaten houden, kwam er een dame voor een bakkie en wat nieuwe wolletjes. Ze haalde haar project uit haar tas, en wauw, dat was iets wat ik nog nooit gezien had! Ik heb bovenstaande foto er van gemaakt.
Het heet dus flower looming en ze liet zien hoe ze het deed. Geen haaknaald komt er aan te pas alleen wikkel je het garen in een bloem vorm op een bordje met stokjes. Door het garen (met een beetje metaal erin) wordt het een prachtige 3D bloem. Het garen dat deze dame gebruikte was Rico Creative Reflection. Echt supermooi garen. Ik hoop dat hij deze zaterdag compleet hangt in de winkel als voorbeeld! Kan ik hem even bewonderen.

Wil je het ook proberen? Ze deed het geloof ik met de Prym flower loom en ik vond er een filmpje van! Er is er ook eentje van Clover (Hana-Ami flower loom) maar het idee is hetzelfde!

Fijne Vrijdag!

~~~~~~~~

I hope you are not getting bored with me talking about what happens during my workshops, but there is so much inspiration from my LYS and it's so much fun!

This Saturday while I was keeping an eye on the progress of my participants, a lady walked in for a cup of coffee and a few balls of yarn. She started unpacking her project and I was stunned! The picture above is what she showed me. It is going to be a shawl made of glittery, 3D flowers. I had never seen this before. It is called flower looming. You need a board or loom, some yarn and that's it!
Wind the yarn around the sticks and make a few layers and you can make a cute flower. The yarn the lady used was Rico Creative Reflection and because it is a bit stiff from a bit of metal it stays in shape beautifully. I really hope to admire the full shawl this Saturday!

Want to try it yourself? I think she used a Prym Flower loom, but Clover has one too (the Hana-Ami flower loom)! I have put a YouTube video with the Prym loom but the idea is the same.

Have a great Friday!


donderdag 19 februari 2015

Tutorial: Designing Crochet Edgings/Zelf gehaakte randjes ontwerpen


~ Deze blogpost bevat affiliate links. Als je daarop klikt dan houd ik daar een klein bedrag aan over. Ik kies alleen producten waar ik zelf heel blij van wordt en zelf uitkies. 
Ik maak dus geen reclame voor bedrijven die mij zomaar aanschrijven, ik moet het echt leuk vinden en gebruikt hebben! ~

Zoals jullie gewend zijn is het vandaag video tijd, maar dan toch net een tikkeltje anders. Ik schrijf vooral wat er in me opkomt en babbel wel door, maar mijn video tutorials waren heel erg "jufachtig". Leerdoel, laten zien, in de herhaling, nog een keer in de herhaling en het leerdoel herhalen.
Een tijdje geleden was ik bezig met filmen en bedacht ik me dat zoiets als vloggen (in plaats van typen op een blog een videoboodschap posten) ook wel leuk zou zijn. Gewoon laten zien waar ik in mijn hoofd of met mijn handen mee bezig ben en erbij vertellen.
Ik deed de camera aan en voila, een filmpje over hoe ik randen aan mijn haakwerk ontwerp. Waar ik op let, wat ik leuk vind en hoe ik het inpas. Ik laat jullie als het ware meekijken in mijn hoofd!


Dus vandaag een filmpje over randjes. Voor dit soort projecten is het altijd handig om een stekenboek in huis te hebben. De stekenbijbel schijnt handig te zijn (ik heb hem zelf niet helaas) maar bijvoorbeeld van Linda Schapper (die ook nog andere stekenboeken heeft) is echt i-de-aal! Ik heb er zelf een flink aantal staan. Ik houd van dat soort boeken :) Noem het maar een verslaving!

Hieronder een selectie van boeken die ik heel vaak gebruik:

Veel plezier met het filmpje!
Hoe pak jij randen aan? Ga je zelf iets verzinnen, of gebruik je een favoriet patroon?

~~~~~~~~
~This post contains affiliate links. This means I will earn a small amount if you click on the links. I only promote crochet goodies that have my complete approval and love and I pick them myself. I do not post random promotions, only when I really like something! ~

It's Thursday, so video tutorial day, but I would like to post something a bit different. I was toying with the idea of vlogging a bit, and instead of being all teacher like, just talk you through things I am working on, or show you random crochet stuff.


 I pushed the  "record" button a few weeks ago and just started improvising, and here it is! A video in which I talk about designing borders. What to choose, what to look for and how to adapt patterns. I really wanted to show you how I think about this subject!

The most important thing for designing is having stitch dictionaries on hand. They are awesome! You can imagine I have quite a few on my booksheld. It is way too tempting if I find a new one with stitches I have never seen, so most of the times such books are going home with me. I love them.

Here is a list of my most used books:


Have fun with the video! What is your favorite border pattern? Do you stick to the pattern or adjust if needed?


woensdag 18 februari 2015

Crochet Injuries


Afgelopen zaterdag deed ik een workshop met een nieuw groepje mensen. Superleuke vrouwen die het heel snel oppikten. Heerlijk was dat. En al hakend raakte ik aan de praat met de dame naast me. Ze wordt van de zomer oma en zou het zo leuk vinden om iets te haken voor het aankomende kleinkindje. Maar ja, ze kreeg vaak last van een tenniselleboog. Breien ging al soms niet meer, en ik waarschuwde haar: van haken kan het zijn dat je ook last krijg. Terwijl ik dus ook al met een stijve arm zat!
Helaas voelde ze hem aan het einde van de workshop behoorlijk dus heb ik haar zoveel mogelijk tips meegegven die ik hier ook al verzamelde.

Het is en blijft natuurlijk niet leuk, zo'n blessure. Het blijft een zwakke plek, die je irriteert met die kleine beweginkjes van haken (of breien). Jaloers ben ik op de mensen die de hele dag haken, maar ik weet dat zo denken natuurlijk ook niet helpt. Doe wat kan, doe niet wat niet kan.

Bij mij was de schuldige een bol dikke acryl/wol mix die ik in twee dagen weghaakte voor een nieuw vest. Dat was hard werken en o wat was mijn arm stijf! 

Nu trekt het weer weg na heel veel liefde en strekken en massages, maar heb ik wel de stap genomen om eens met een fysiotherapeut te babbelen. Het gaat soms tijden goed (echt heel lang) maar alleen als ik met wol haak. Ga ik een tijdje haken met acryl of katoen dan voel ik hem (en computeren werkt natuurlijk ook niet mee). Ik hoop dat ik mijn zwakke plek sterker kan maken....

Zaterdag aanstaande zie ik deze mevrouw weer, heeft iemand nog geruststellende tips voor haar? Ik zou ze graag met haar delen! 

P.S. Zie je de drie ontwerpen van mij op de foto? ;)

~~~~~~~~~~

This past Saturday I hosted a workshop for beginner crocheters. They were an absolute delight to work with, and they picked it all up very quickly. Whilst crocheting and learning their stitches I got talking with one of them and learned she was going to be a first time grandma this summer and she really wanted to crochet one for the baby in the making. But she also told me she loved to knit but she did not love the effects it had on her tennis elbow. So I warned her. Crochet is the same movement and it was a possibility that she could feel it tensing up after crocheting for some time. I could tell, because mine was flaring up again.

Unfortunately she did feel the tension after the workshop so I gave her some tips which I posted a few months ago. I really hope it helps for her.

It's just no fun having such an injury. Crochet is so relaxing, but the effects are not always fun for me. Those little movements are sometimes a trigger for my tennis elbow to tense up and start misbehaving! I am jealous sometimes of those people who can crochet any day, the whole day. But I also know that thinking like this does not help and that I must do what is in my power to do.

Last Wednesday and Thursday I crocheted with a very bulky yarn for the first time in ages and it was hard work. Ergo: my tennis elbow kicked back and has me taking it easy since Friday. Boo.

The stiffness is slowly going away but since it will always be a tender spot I though it would be wise to make an appointment with a physical therapist. I really hope I can do something to toughen up my muscles, or make the tensions go away quicker. I know it will not go away completely unfortunately!

This Saturday I will see the Mrs with the tennis elbow and I hope she is doing okay. I would love to hear from you if you have any hints or tips concerning tennis elbows or other RSI injuries! I would gladly pass them along!

P.S. Can you spot the three designs I made on the picture? ;)

maandag 16 februari 2015

~ Monday Music ~

Een paar weken gelden liet mijn lief dit filmpje zien. Wat een stem heeft de zangeres van Heart nog steeds en hoe mooi is het om te zien hoe de mannen van Led Zeppeling GENIETEN!

~~~

A few weeks ago my hubby showed me this video. It is amazing to heart that Annes voice hasn't changed a bit and how much the guys from Led Zeppelin are enjoying her perfomance!

zaterdag 14 februari 2015

Busy Fingers Showing Off!! #80

Fijne Valentijnsdag!! Manlief en ik hebben het grootste deel van het weekend het rijk alleen dus wij gaan straks lekker met zijn tweetjes wat leuks doen :)

Geniet vandaag van de liefde! 

Vandaag een hoop haaksels in de Link Party, wat een heerlijke projectjes! Hieronder de meest aangeklikte links:

~~

Happy Valentine's Day!!! Hubby and I are having most of the weekend to ourselves so we are going to use that time to hang out together :)

Enjoy this day with your special love!

Lots of crochet this week in the Link Party, such gorgeous projects! Below are the most clicked links:


Number 1

Grannies haken met rozen
Helena made this granny pillow coer. The pattern can be found in her post! I adore the 3D effect of the roses.


Number 2

 
Daphne made the ever popular dachshund from Stip & Haak ! Cute!


Number 3

Sofie whipped up a poncho for her eldest girl. I love the colour combinations and the border! Luscious!

Zijn jullie al bezig met zomerprojectjes? Ik begin er alweer aan te denken. Ben benieuwd wat jullie deze week allemaal gaan linken! Veel plezier!

De meest aangeklikte projecten zet ik in het zonnetje op Facebook en op Pinterest!
Hoe meer zielen hoe meer vreugd, deel deze link party alsjeblieft!
                                             ~ Volg me op Facebook - Twitter - Instagram ~


Are you already working on summer projects? I am thinking about, slightly, in the back of my mind. I am curious to see what you are going to link up in this weeks link party! Have fun!


 If you get the most clicks I feature you on Facebook and Pinterest.
Don't forget to share, the more link ups, the merrier the party will be.
~ Follow me on Facebook - Twitter - Instagram ~

vrijdag 13 februari 2015

Friday Find: Gummi Bears!


crochet gummy bears. Could probably also add an extra set of lefts and tweak the head a bit to make water bears (nerdy? yes.)

Ik vind ze officieel schattig :) Je kunt ze als broche dragen, of als geintje een zak vol maken haha.

Het patroon is hier gratis te vinden en is ontworpen door Twinkie Chan, een supervrolijke haakster met een zwak voor kawaii (japans voor schattig).

Fijn weekend!

xx
Barbara

~~~~~~

These little bears are soooo awesome! Think of all the possibilities: a chain with gummi bears, or as a prank gift a whole bag of them haha.

The pattern can be found here for free and is designed by the adorable and little nutty Twinkie Chan who likes to design kawaii crochet (japanese for cute).

Happy Weekend!

xx
Barbara

~ Follow me on Facebook - Twitter - Instagram ~

donderdag 12 februari 2015

Tutorial: Bobble Stitch / Bobbelsteek


Ik heb al eens eerder een tutorial gemaakt voor een bobbel steek, maar kreeg het verzoek of ik alsjeblieft het ook op video wilde laten zien! Het verschil tussen mijn vorige tutorial en deze is dat ik de gewone bobbelsteek show in plaats van de gekantelde en ook de twee manieren waarop je ze kunt maken. Prachtig hoe er verschil kan zijn met 1 steek!

Hoe maak je hem?


De bobbelsteek wordt gemaakt over een meervoud van 2 (vaak). Let op: haak niet te strak, anders zit je te trekken en te prutten met al die lussen op je naald!


*maak omslag, steek in naald, haal door steek*, herhaal tussen ** nog twee maal in dezelfde steek (7 lussen op je naald)

En nu de twee manieren hoe je al die lussen van je naald afwerkt!


Manier 1: Maak een omslag, haal door 7 lussen, en eindig met het maken van een losse om de bobbel te sluiten.

Manier 2: Maak een omslag, haal door 6 lussen (2 lussen op naald), maak een omslag en haal door de laatste 2 lussen.

Veel plezier met de tutorial!

~~~~~~~~

I already made a tutorial about the slanted bobble stitch, but there were a few requests to actually see me doing this stitch! It is a video of a normal bobble stitch and I am showing you two ways on how to do this cutie pie.

There are actually two ways of closing this stitch, and I only learned about one of them last week. I was surprised! So I am showing you both ways.

How to make the bobble stitch?


 The bobble stitch is mostly made over a multiple of 2.

Do try to crochet a bit loose, otherwise you will be struggling with getting your last loop done!
 
*yarn over, insert hook in stitch, yarn over, pull through stitch*, repeat two more times in the same stitch (7 loops on hook)
Now, all those loops, what to do with them?

Way 1: yarn over, pull through all 7 loops, close bobble with chain stitch

Way 2: yarn over, pull through 6 loops, yarn over, pull through last 2 loops.

Have fun with the tutorial!


woensdag 11 februari 2015

Pattern: Crocheted bowtie/Gehaakt Strikje


Voor mijn beginnerscursus moest ik heel hard nadenken wat ik mijn deelneemsters als leerdoel moest geven. Het moest snel zijn, niet te moeilijk en eventueel zonder mijn hulp te haken zijn. Een strikje haken stond al heel lang op mijn to-do lijstje en dat was eigenlijk perfect! De eerste workshop avond begonnen ze er aan, en ik kruiste heel hard mijn vingers of het ze ging lukken, maar de tweede avond hadden ze allemaal het strikje opgespeld! Hoe tof is dat!
Hierboven zie je het blad dat ik heb uitgedeeld en hier kun je het als PDF downloaden. Je kunt het patroon zo aanpassen dat je een groter of een kleiner strikje haakt. De blauwe is gehaakt volgens het patroon maar de roze heb ik gemaakt met een startketting van 4 lossen en dus 3 vasten. Je haakt door tot je een rechthoek hebt en maakt hem op dezelfde manier klaar!

Veel plezier met het patroon en laat vooral eens zien op mijn FB pagina hoe die van jou er uit ziet!

~ Volg me op Facebook - Twitter - Instagram ~

~~~~~~


 A few weeks ago, while I was writing the material for my crochet beginners workshop, I was contemplating a beginners project that every crocheter should be able to make after a first lesson. It should not be too hard, not too big, and should be doable without my help. A crocheted bowtie was on my to-make list for this year, and I thought it was perfect for a beginner. You only need to make single crochets and work it together. I wrote a very simple pattern, with no weird terminology and off they went after their first evening of learning to crochet. The second evening they were all wearing the bow! How awesome is that? You can easily adjust the size of the bow. For the blue bow you follow the pattern as given, but the pink one is smaller because I chained four chains at the beginning and made rows of 3 single crochet stitches. You go on and on until you get a nice rectangle and assemble as given in the pattern. You can download the pattern as a PDF right here.

Have fun and please do show your bow if you make one on my FB page!

~ Follow me on Facebook - Twitter - Instagram ~ 

Coffee Ponderings 2/11


Goedemorgen lieve lezers,

Zo sippend aan mijn koffie denk ik aan gisteren. Je weet, ik ben nogal aan het proberen in balans te komen, maar dat gaat niet altijd van een leien dakje. Ik ben superenthousiast dit schooljaar, en dat leidt er wel eens toe dat ik toch wel te snel 'ja' zeg tegen dingen die er op mijn pad komen. Oeps. Je zou toch denken dat een bijna 34-jarige dame toch wel wat wijzer zou zijn!
Maar vorige week zei ik 'ja' tegen een workshop Shawl haken, of ik dat wilde doen. 'Superleuk' was mijn eerste gedachte en ik zei 'ja' nadat het thuisfront goedkeuring had gegeven. Afgelopen zaterdag legde ik de agenda open en zag ik dat ik twee weken twee avonden workshops dan zou geven. En de woorden 'twee workshops in de week is eigenlijk te veel' waren juist de avond er voor uit mijn mond gekomen.
Dan ga je twijfelen he. Je hebt dan al ja gezegd, en iets beloofd en ik vind het dan zo moeilijk om er op terug te komen.
Tot mijn collega gister zei: 'Als je denkt dat het teveel is moet je je niet schuldig voelen en het eerlijk zeggen!' We hadden het over werkdruk, en over 'nee' leren zeggen. En ik vertelde over de workshops die gepland waren.
En zij zei: 'Ga NU bellen nu het nog kan.'
De twijfel was weg, ik belde, met een beetje een knoop in mijn maag, en kreeg alleen maar begrip. Zo fijn!
Wat een rust.
En wat een leerzaam moment. 'Nee' zeggen, ook als je twijfelt, is iets dat ik als een  mogelijkheid moet zien!

Herkenbaar? Op wat voor momenten zeg jij te vaak 'ja'?

~~~~~~

Goodmorning my dear readers,

I was sipping coffee this morning and I was pondering about what happened yesterday at work. I was talking to a colleague about saying 'yes' too often to things I am excited about, but would cause me to get out of balance too often. You know I am working on this, and how hard it sometimes is! 
I should now better and be a wise woman at almost 34 right? Well, I have lots of things to learn...
I said 'yes' to teaching a shawl workshop last week, but I failed to remind myself I already had an evening workshop to teach in the same week. Last week was my first time doing two evenings in a row and I said to both hubby and myself "It is too much work to do two evening workshops in one week'.  Ouch.
So I was debating with myself to call them up and explain my feelings and doubts about that workshop but I also knew the workshop agenda was going to be published yesterday. Dilemma!
My colleague looked at me and said: 'We really should be able to just tell someone 'no' and not feel guilty about it right? You should call them right now!'

And I did. I called my LYS.
And got nothing but understanding.
They are the loveliest couple ever.

The burden fell off my shoulders and I know have enough time to prepare for the workshop and get more balance in the upcoming weeks!

I think this is a thing lots of people experience, saying "yes" with doubt. What are your pitfalls?

dinsdag 10 februari 2015

Cup Of Zen


De afgelopen weken was een kopje thee mijn momentje van rust. Echt even ontspannen in de hectiek van school, werk (ook school), verjaardag, toetsen en workshops. Een slokje warmte, letterlijk!
Gisteren pakte ik na een week weer een prive projectje op. Zo heerlijk is dat!
Even weg van alle stress in mijn hoofd en gewoon lekker haken.
En het gaat ook lekker met het rennen. Ik volg een heel rustig schema, 2x in de week bouw ik op tot een kwartiertje rennen. Daarna stap ik weer over op Rennen met Evy denk ik.
Met mijn nieuwe klas op school, de verbeteringen die bij ons op school moeten worden doorgevoerd en haakworkshops geven is het dus weer even zoeken naar een nieuwe balans en dat is niet altijd even makkelijk! Maar het gaat. Dat is wel het goede nieuws. Het is hier ook wel wat rustiger geworden, maar vrees niet, ik ga gewoon door! Ik wil deze week een gratis-perfect-voor-beginners patroontje plaatsen en donderdag weer achter de camera kruipen. Want lieve lezers, daar krijg ik zo veel energie van!

Ik wens jullie een superweek toe!

xx
Barbara

~~~~~~~~~~

I had to make me sit down and sip a cup of tea for the last few weeks. Life sucked me up and twirled me around with school runs, work, a birthday, grading and crochet workshops! One sip of warm, steaming tea and it all glided from my shoulders. Literally. It felt really good, so I am keeping up this little moment (right now actually!).
Yesterday I picked up a private crochet project for the first time in a week. So relaxing and nice..
You know the feeling when you pick up that hook and lose yourself in the flow of making the stitches? That feeling. So good!
And running really really helps. I am building up to 15 minutes per session and I am taking it slow. 
I am balancing life, my new class, school improvements and teaching crochet workshops at the moment and it is sometimes difficult not to get too deep into one thing and forgetting about the other things, but I am getting there.
The blog has been a bit quieter than usual, but no worries! My dear readers, I still love this place! I will publish a little-perfect-for-beginners crochet pattern and on Thursday I will film a new tutorial. Yes, my dears, I still get a lot of adrenaline of this little blog spot!

Have a superduper week!

xx
Barbara


maandag 9 februari 2015

~ Monday Music ~

From the epic movie "The Breakfast Club"!

zaterdag 7 februari 2015

Busy Fingers Showing Off!! #79

Goeeeeeeedemorgen! Eindelijk is het zaterdag, weer een dag om wat rustiger aan te doen :) Vandaag is het feest in huize Zomaar Een Dag voor Kathelijnes verjaardag, maar natuurlijk is het eerst tijd voor de wekelijkse Link Party! Er is weer van alles heerlijks geplaatst vorige week!

Maar nu in de schijnwerpers:

Gooooooooooooooooooodmorning! It's Saturday, finally! A day to slow down a bit. It's party time today at the Zomaar Een Dag home to celebrate Kathelijnes birthday, but first things first: the link Party! There were so many projects linked up last week!

But right now, in the spotlight:


Number 1


This is the second week with a Katniss cowl in the spotlight! Leen used Scheepjes Stonewashed for it, and it is such a beautiful yarn and perfect for this cowl. I love it!

Number 2

One of the things that is on my to do list: Sophie's Garden! Joke made a few rounds this week and has a couple of colour options on her blog. With links to both Dutch and English patterns!

Number 3


Sofie started a V-stitch blanket in pink. I love the softness of the stitches... Perfect for a baby blanket!

Nog even een superduperdankjulliewel voor alle kliks/stemmen die jullie achtergelaten hebben!!

I really want to thank you all for the clicks and visits to my lovely fellow party members!

See you next week!

De meest aangeklikte projecten zet ik in het zonnetje op Facebook en op Pinterest!
Hoe meer zielen hoe meer vreugd, deel deze link party alsjeblieft!
                                             ~ Volg me op Facebook - Twitter - Instagram ~


 If you get the most clicks I feature you on Facebook and Pinterest.
Don't forget to share, the more link ups, the merrier the party will be.
~ Follow me on Facebook - Twitter - Instagram ~


vrijdag 6 februari 2015

Check your gauge!


Deze avond gaf ik een workshop Granny's haken bij de plaatselijke wolwinkel en wat was het super! Maar ik kon het niet laten om juist deze foto te maken! Allebei gebruikten we hetzelfde garen en dezelfde maat haaknaald. Wat is haken en draadspanning toch zo iets enorm persoonlijks! Geen mens haakt hetzelde.. Dus wijze les: haak je iets dat echt een bepaald formaat moet hebben, controleer dan je stekenverhouding!

I just got back from teaching a Granny square workshop and I had such a blast! I just could not help myself and make this photo. Do you see the difference in size? We both used the same kind of yarn and the same size crochet hook. Soooo always always check your gauge if you need to make a certain size because no two people are the same!

donderdag 5 februari 2015

Tutorial: The Easy Quilt


Dit kan echt iedereen met een naaimachine! Serieus. Geloof me. Zoek je een snel dekentje voor jezelf of als cadeautje? Dit lieve dekentje maakte ik voor Kathelijne, en showde het gisteren.
Wil je hem zelf maken? Ik beschrijf het heel globaal en geef links naar tutorials die ik zelf heb gebruikt. Je kunt het!

Wat heb je nodig?
Naaimachine
Quiltgaren (Gutermann katoen bijv) in het spoeltje voor onderdraad en bovenop de machine
Bias band (minstens 4x zo veel als de breedte van je quilt)
2 leuke stofjes van ongeveer 1.50 bij 1.50 (dit is genoeg voor een kinderdekentje of kleiner in het geval van een baby deken), de hoeveelheid stof van de stof aan de voorkant moet kleiner zijn dan de achterkant.
Tussenvoering (katoen of synthetisch) in een iets kleinere maat dan de achterkant. (zie ook link over sandwichen)
Spelden
evt. losse quiltnaald
textielstift
geleider (zie foto)

1. Knip de stukken stof en de tussenvoering van 1.50x1.50 of in gewenste maat.
2. Maak een sandwich van alledrie de lagen met wateroplosbare lijmspray (Action!) of rijg of speld de lagen vast.
3. Zoek het midden op van de stof en zet een lijn over de breedte of de lengte. Het maakt niet uit, gewoon de middellijn!~
4. Zet de naaimachine op standje 1 mm, zet de naald in de middellijn, naai ongeveer 5 mm, ga terug, en weer heen. Zet na die 5 mm de naaimachine op 1.5 en stik de middellijn volledig door. Kom je aan bij de laatste 5 mm dan zet je hem weer terug op 1 mm, naai tot het einde en hecht af door eerst terug en dan weer heen te gaan.
5. Zet nu de geleider in je voetje, en kies een afstand die je wilt aanhouden tot je naad. Ik koos voor iets minder dan 7 cm (7 cm was het maximale).
6. Zet de geleider op de middellijn en stik dus op ongeveer 7 cm afstand de deken door. Zo werk je de hele eerste helft af.
7. Draai de quilt om, zoek weer de middellijn en werk de andere helft af.
8. Maak netjes alle hoeken recht met behulp van deze tutorial.
9. Begin dan met bias band. ALLES maar dan ook ALLES over het vastnaaien van dit bandje deed ik met deze tutorial. Alleen stikte ik de bias band door na het dichtvouwen. Dat deed ik met behulp van deze tutorial. Niet helemaal perfect, maar hij zit mooi dicht!

Klaar! Stop de eindjes bij de bias band weg met de quiltnaald.


~~~~~~~~~~~~~~

My little girl is very happy with her very own quilt! It was very easy to make and I think you can do it as well! So for this weeks tutorial I thought "let's do something else instead of crochet!" If you have a sewing machine, you can absolutely do this! I give you basic instructions and provide links to sites I used myself.

Go for it!


You'll need
2 big squares of fabric (about 55" square), the fabric that is going to be the back of the quilt has to be about 2" larger than the fabric that is going to be the front.
1 big square of batting, a little bit bigger than your front fabric.
Quilt thread
Sewing machine
Quilting bar (see picture)
Pins
Bias band (at least 4 times the width of your blanket)
Quilting needle
fabric marker

1. Cut your fabric and batting in the desired size
2. Mak
2. Make a sandwich of all three layers with watersoluable glue spray, or pin all layers together
3. Find the center of your quilt and mark a line in the center from top to bottom.
4. Put the needle of your sewing machine and select smallest stitch (1 mm), sew 1/4", go back, and sew another 1/4", select 1.5 mm and stitch along the marked line in the center of the quilt.
4. Zet de naaimachine op standje 1 mm, zet de naald in de middellijn, naai ongeveer 5 mm, ga terug, en weer heen. Zet na die 5 mm de naaimachine op 1.5 en stik de middellijn volledig door. Kom je aan bij de laatste 5 mm dan zet je hem weer terug op 1 mm, naai tot het einde en hecht af door eerst terug en dan weer heen te gaan.
5. Attach quilting bar to sewing foot. Select a distance you want between the middle and the next stitch line and put the quilting bar on your first stitch line. And sew a second line (I chose about 7 cm, the widest distance allowed by the quilting bar).
6. Continue this for the first half of the quilt.
7. Turn quilt, and stitch the second half of the quilt.
8. If needed, square off your quilt with this tutorial.
9. Start with the binding! Either make your own or use bias binding from the store. I used every step (just not last) of this tutorial. It is such an awesome tutorial! I did not close the binding by hand, but stitched it shut on the back of the quilt with help of this tutorial.

Done! Hide any ends with help of a small sewing or quilt needle.

Have fun
xx