vrijdag 6 december 2013

Leer Tunisch Haken: In Het Rond


De komende lessen gaan meer tutorials dan patronen worden omdat ik een meer een bepaalde techniek wil bespreken dan echt een patroon geef. Natuurlijk maak je ook iets met het tutorial, want anders heb je er ook niet veel aan ;)
Bij iedere tutorial zorg ik er voor dat je een printvriendelijk ebookje krijgt zodat je niet moeilijk hoeft te doen om deze post op te slaan of uit te printen!

Veel plezier, want deze les ga je voor het eerst met die leuke tweezijdige haaknaald werken! We gaan in het rond werken en je kunt deze tutorial gebruiken voor alles wat je kan verzinnen waar je een cilinder vorming projectje voor zou kunnen gebruiken. Een koffiemok cozy bijvoorbeeld, of polswarmers. Ik gebruik hier een glazen pot waar ik een cozy voor maak.

KLIK hier voor het printvriendelijke ebook!


Neem je tweezijdige haaknaald en een stekenmarkeerder. De stekenmarkeerder is echt een must.


Maak een ketting van lossen die zo lang is dat hij redelijk stevig om je voorwerp past. Niet te strak.


Sluit de ketting tot een ring met een halve vaste.


De lus op je haaknaald is nu de eerste steek van een ronde, markeer deze met de stekenmarkeerder.


Neem lussen op zoals je zou doen bij een algemene heengaande toer.


Neem zoveel lussen op je haak als lukt, niet te veel want anders merk je dat alles te strak gaat zitten.

Probeer nu goed op te letten...


Kijk goed naar de naald. Je werk zit aan de linkerkant.


Draai je naald, zodat je werk nu aan de rechterkant ligt.


Schuif je werk naar de linker haak van je naald.


Neem je tweede kleur of een tweede bal. Omdat we in een spiraal gaan haken hoef je geen losse te maken. Je gaat nu werken als een teruggaande toer. Dus maak een omslag en haal door twee lussen.


Zo dus. Herhaal dit tot je ongeveer 3 of 4 lussen op je naald over hebt.


Hier zijn de lussen er af gewerkt. Je wilt nu weer verder waar je gebleven was met je eerste kleur, dussss....


Draai je naald weer. Je werk ligt aan de rechterkant.


En schuif het werk weer naar de linkerkant. Nu ga je weer met je eerste kleur aan de gang om lussen op je naald te nemen.


En hier heb ik weer genoeg heengaande steken.


Ik draai mijn naald. 


Ik schuif het weer naar links en nu is de kant waar mijn gele garen aan hangt weer beschikbaar om mijn lussen als bij een teruggaande toer van mijn naald af te werken.


Ik stop bij drie steken


Ik draai hem weer om, schuif mijn werk op naar links en ben klaar om de laatste steken van mijn ronde op te nemen. Je ziet, mijn eerste steek is in de buurt.


Ik ga spiraalsgewijs haken, dus ik steek mijn naald zoals de Gewone Tunische steek (die ga ik hier gebruiken) achter de voorste verticale draad en maak een omslag en neem de lus op mijn naald. Dat is dus de eerste steek van mijn tweede ronde.


Hier is hij ietsje duidelijker. Nu moet ik mijn stekenmarkeerder verplaatsen naar de lus op mijn naald.


En daarna ga ik vrolijk verder met de GTS voor de tweede ronde.


Dit is hoe je werk er uit gaat zien. De kleur waar je als eerste mee gaat werken maakt de verticale draden en de tweede kleur zorgt voor de achtergrond.

Ga gewoon door zoals hierboven is beschreven. Neem je lussen op, draai je werk, werk je lussen er af aan de andere zijde. Herhaal dit tot je cozy lang genoeg is.


Neem de laatste steek op voor je stekenmarkeerder tijdens je heengaande toer. Draai je werk om en werk je lussen van je naald af tot je twee lussen over hebt.


Neem de draad waar je de teruggaande toer mee maakt en maak een omslag en haal ze door de laatste twee lussen. Knip de draad af op ongeveer 15 cm vanaf je werk.
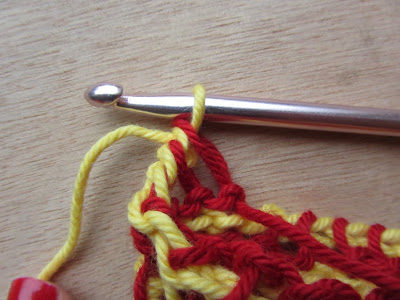
 

Dit is je eindpunt nadat je de laatste twee lussen hebt afgewerkt.


Draai je werk om, nu ga je je werk afmaken met de eerste kleur/draad.


In de laatste ronde maak je halve vasten (net als een gewone afsluitende toer/ronde bij Tunisch haken) door je naald op de GTS manier in te steken. Herhaal dit voor alle steken.


Maak een halve vaste in de eerste steek van de laatste ronde en hecht de draad af.


Tadaa! Een cozy!

Learn to Crochet Tunisian Style: In the Round


The last four/five (still haven't decided yet ;) ) lessons will be more tutorials than exact patterns. I am going to try to make printerfriendly versions of these tutorials so that you can print them out easily and will look nice. The techniques I am going to cover in these lessons are hard to find on the net, so I hope you will give them a try as they are very much fun!

Today I am going to show you how to crochet in the round Tunisian Style! Grab that two-sided hook that you were wondering how to use and very very carefully read this post. I really really am going to try to make a video of this techniqeu with Big Man but we have to be kidless then, so please be patient. Grab two colours, or two balls of the same colour for this tutorial. We are going to make a glass jar cozy as a project, but it could also be a mug cozy, wrist warmer, you name it. Any project which uses a cilindrical shape can be made with this tutorial!

CLICK here for the printerfriendly ebook!


Now, grab your hook and a stitch marker. Really, use a stitchmarker!


First of all, make a length of chain stitches that fits snugly around your project. I chose to start with red. The colour you start with will get the vertical bars, and the second colour will be the background colour. You will see what I mean in a bit.


Close your chain with a slip stitch, carefully not to twist it.


 The loop that is now on your hook is your first stitch. Mark this stitch with the stitch marker.


Start picking up stitches like you would do for the foundation row forward pass.


Do not try to pick up as many stitches as you can, because it will get stretched as you are working in a circular fashion. Just pick up ten or 15 stitches max.

Pay attention now please!


Watch your hook. You just picked up stitches and your work is on the left side.


Flip your hook to the other side. Your work will now lie at the right side!


Slide your work to the left hook. So remember, flip your work and hook and slide your work to the opposite side.


Take your second ball or second colour. Since you are going to make rounds in a spiral way you do not have to make a chain stitch. Just put your yarn over the hook and pull through two loops like you would do on a return pass.


Here you go, here you worked most of your stitches with a return pass. Stop when you have about 3 to four loops on your hook. Now you want to pick up some more stitches with a forward pass.


Flip your hook again.


And slide to the left side. Pick up your first yarn strand (in my case the red yarn) and start picking up loops.


And I have enough forward pass stitches again.


I flip my work.


And I slide it again to the left, and my yellow yarn is free again to work with and to work of my loops with a return pass.


I stop at three stitches.


And I flip it over, slide it to the left and finish my first round of picking up loops with the forward pass.


Since I am going to make this cilinder with a spiral, I just go on, slide my hook in the first stitch behind the vertical bar (I am going to make a completely Tunisian Simple Stitch cilinder) and pick up my loop.


Here is my first loop of the second round. Reposition your stitchmarker to that loop.


Here you can see I have put my stitchmarker into the loop of my first stitch and without worries I can pick up more stitches.


This is how the first round will look if you are using two colours. The first colour (forward pass) you used will create the vertical bars and the second colour (return pass) will create the background.

Go on like this. Pick up loops, flip your hook, work the return pass with the second colour and do not forget to reposition your marker. Carry on until your work is long enough.


Pick up the last loop before your stitchmarker. This will be the end of the last round. Work your loops off your hook in the return pass with your second yarn and work until you have 2 loops left. One will be the colour of the forward pass, and one of the return pass.


Take your return pass yarn/colour and work those last loops in a normal return pass manner. YO, pull through last two loops.


This is the result.


Flip your work, slide to the left and cut off your second yarn strand. Leave  an end of about 7". 


Work your last round as a last row, slipstitching in a TSS way (inserting your hook behind the front vertical bar) along the whole round with your first yarn strand/first colour.


Slip stitch in first stitch and fasten off.


Tadaa! A cozy!

donderdag 5 december 2013

Busy Fingers Showing Off!! #25

It's back! How are all the Dutchies doing with the Sinterklaas stress? Assistent Sinterklaas (me) number 201357 still needs to wrap a few presents..... I haven't had much time to wrap/crochet/doanything else because of appointments and other stuff, but I hope to be able to get some crafting time with hook and yarn soon! I really need to show you my progress on my quilt because that one is wrapping up pretty quickly!

De party is terug! Hoe gaat het met de medeNederlanders en de Sinterklaas stress? Alles al in huis gehaald, hulpSinterklazen? Het is een drukke tijd voor iedereen nu, en ik merk bij mezelf dat ik maar weinig tijd heb om te haken. Ik hoop dat het snel weer anders is!
 

Here is the top three most clicked links from last week's party!

Hier is de top drie meest geklikte links van de Party van vorige week!


Number 1
Flower Pot Heater made by Liz @Howling at the moon


Number 2

Owl bags made by Renate @ Renates haken enzo


Number 3

Foto
Beautiful blanket made by Studio YKKE (new kid on the party!) @ Studio YKKE


Thank you so much for linking up! I will feature you both on Facebook and Pinterest (and mabye even on Twitter, how's that for getting some exposure @zomaareendag ? :) )

Want to get featured too? Please join the new party! Please be aware that if you post your url you really need to post the BLOG POST url, not your website url!!!

Here is the new Link Party, I would love to see your Sinterklaas and Christmas projects!!

Dank jullie wel voor het meedoen. Ik zal jullie projectjes op mijn Facebookpagina en op Pinterest zetten (en misschien zelfs op Twitter, dat zal wel wat aandacht voor jullie creaties geven @zomaareendag!)

Wil je meedoen? Leuk! Post je blog post link in de Link up hier beneden, let er op dat je niet je Website URL kiest, want dan kan ik je post niet vinden.

Doe vooral mee met de Party! 


woensdag 4 december 2013

Christmas Crochet Patterns Round Up!

I thought it would be fun to have a bit of a Christmas Crochet Round Up. I am really getting in the mood for Christmas. Maybe I will try and make a little Christmas project.....
Ik dacht: het is vast wel leuk om een aantal Kerst haakpatronen te verzamelen in een blogpostje! Ik heb er namelijk al heel erg zin in en er is zoveel inspiratie! Misschien dat ik nog snel een projectje speciaal voor Kerst ga starten...

Click on the pictures to go to the source!
Klik op de plaatjes om naar de bron te gaan!


http://www.lemondedesucrette.com/2011/11/16/little-christmas-socks-the-pattern/ 

http://earning-my-cape.blogspot.nl/2012/12/christmas-holly-free-crochet-pattern.html 

Baubles 

http://www.yarnspirations.com/pattern/crochet/cross-stitch-christmas-stockings 

Image 

http://whiskersandwool.blogspot.nl/2011/11/christmas-wreath-ring-christmas.html 

http://hannicraft.blogspot.hu/2012/12/crochet-christmas-tree.html 

Have fun, there are loads and loads of free Christmas patterns over at Ravelry!

Veel plezier, er zijn ladingen gratis Kerstpatronen te vinden op Ravelry!

maandag 2 december 2013

~ Monday Music ~

This song takes me back to my years at university and my fraternity :)


zondag 1 december 2013

One of those days


You probably know them. Those days kids are either whining or doing the exact opposite thing of what you want them to do. 
After two days of trying to hold my temper and being a "good" housewife, I was so glad Big Man took care of the whole bed routine so I could stay downstairs. In silence.

Tomorrow's another working day. Half a day with 90 of my kids at school, half a day with my own two. Who coud have thought those 90 kids were more easy to work with then just two? ;)

I hope you had a great weekend!

Je kent ze wel, die dagen dat je Pattex en behang wenst om je kinderen achter te plakken...
Na twee dagen tot 10 tellen en ook tussendoor de huisvrouw uithangen was ik het zat en was de Grote Man zo lief om de kids naar bed te brengen. Ik bleef beneden. In een heerlijke stilte.

Morgen is het weer een normale werkdag. De ene helft van de dag heb ik 90 kindjes voor mijn neus op school en de andere helft van de dag mijn twee eigen deugnieten.
Wie had gedacht dat die 90 kids bezig houden makkelijker zou zijn dan twee? ;)

Ik hoop dat je een fijn weekend hebt gehad!