donderdag 19 december 2013

Busy Fingers Showing Off!! #27

Hello there!

The last weeks of 2013 are flying by! This will be the last Busy Fingers Showing Off for this year as I am going to let this Party sit for two weeks. I think everyone will be too busy attending Christmas Parties and meeting up with family. I know that I will have much more time to crochet right now so that means a few more finished projects in the coming weeks!

De laatste weken van 2013 vliegen voorbij! Dit is de laatste Busy Fingers Showing Off voor dit jaar, en ik zal de Party twee weken laten doorlopen. Ik denk dat iedereen veel te druk is met Kerst te vieren en op bezoek gaan bij familie. Ik heb zelf pas nu meer tijd om te haken dus in de komende weken komen er vast ook meer afgemaakte projectjes voorbij!

But first things first:

Who got the most clicks?

Maar eerst het belangrijkste:

Wie heeft de meeste kliks gehad? 


Look at how cute!!! Pippi Longstocking!! @ Helena Haakt


Very cute shawl, I really like it! @ Renate's Haken enzo 


Another variation of the crocheted owlies! @ Rianneshaaksels


Please take your button and share the news of the Link Party! I will feature you on Facebook, Twitter and Pinterest.


And here is the new link party. Enjoy and Merry Christmas!


woensdag 18 december 2013

Lazy, yet Productive!


As I am typing this Little Lady fell asleep on the couch, I am working on a new Tutorial for Friday's Tunisian crochet course, Little Man is dreaming away and munching on a cookie, tonight's school Christmas dinner has been prepared and I am ready to put some water on the stove to make lentil soup.

Quietness around the house and a bit of a lazy feeling all around, but anyhow it has been a very productive day. I haven't hold a crochet hook today!

My first day of the Christmas Holidays!

To be honest, I am very, very tired (the headache that popped up a few hours ago is almost gone thankfully) and I really need to recharge a bit.

I do need to say that although I am very tired, I stil feel optimistic which is so much better than last year. I am truly happy about that!

There are a few frustrations of course (such as my Moss Lace test which isn't progressing like I would) but it isn't as overwhelming like it was last year.

I am not going to stress over Christmas, just going to take it easy and relax. I do have to bake a few sweets but it is going to be low key, no fuss and easy. A wonderful prospect!

And to top it off, Big Man and I are going away for the weekend with just the two of us :) Three nights without any interruptions and no kids as alarm clock!!

I wish you all the best for the last few days before the Christmas Holiday Season. Take it easy, no stress!

Terwijl ik dit typ is de kleine dame in slaap gevallen, werk ik verder aan mijn cursus Tunisch haken (vrijdag weer!), droom de kleine man weg bij een koekje, zijn de hapjes voor het Kerstdiner op school klaar en ga ik zo wat water op zetten voor de linzensoep.

Er is stilte in huis, en een soort van lui gevoel, maar tegelijkertijd was het een enorm productieve dag. Ik heb nog geen haaknaald vastgehad! 

De eerste dag van mijn Kerstvakantie!

Om eerlijk te zijn ben ik ongelofelijk moe (de hoofdpijn die een paar uur geleden kwam opzetten is gelukkig bijna weg) en ga ik hopelijk lekker bijtanken in de vakantie.

Ondanks dat ik moe ben, ben ik wel optimistisch. Zo veel beter dan vorig jaar, en daar ben ik blij om.

Natuurlijk zijn er wel een aantal frustraties (zoals mijn Moss Lace test die maar niet opschiet), maar het is niet zo alles over heersend zoals vorig jaar.

Ik ga niet stressen met Kerst heb ik besloten. Gewoon lekker relaxen. Ik ga wel mijn bijdrage leveren voor lekker eten met Kerst, maar ik heb wat makkelijke dingen uitgezocht. Ik laat me niet opjagen!

En last but not least: Grote Man en ik gaan er een weekendje op uit. Alleen wij tweetjes, heerlijk uitslapen zonder kinderalarm!

Ik wens jullie fijne dagen tot de kerstvakantie. Laat je niet gekmaken, en geniet er van!

dinsdag 17 december 2013

Lactosefree/Lactosevrij: Mini oven dishes!


Hmmmmmmmmmmm yummy! I posted these on my Facebook page yesterday, and I had several requests for the recipe. As you wish :)

Mini oven dishes

200 grams of potato cubes
4 big tomatoes (skinned and chopped into pieces)
1 chorizo sausage (chopped up)
250 grams of ham strings
four slices of bacon (thin)
1 can of green peas (200 grams, 140 grams when drained)
4 eggs
2 onions (chopped up)

4 ovendishes

Preheat your oven to 180 degrees Celsius or 
Fry the onions in a pan and add the ham slices and fry for a few minutes.
Add the potato cubes, chorizo, tomatoes to the ham/onion mixture and let most of the moisture evaporate.
Add the green peas, salt and pepper to taste. I like to add some italian herbs to this recipe.
Stir everything wel and divide over the four oven dishes.
Add a slice of bacon and put the egg on top of it.
Put in the oven until your egg is nicely cooked (it took about 15 minutes for me).

Bon Appetit!

Hmmmmmmmm ik had deze mini ovenschaaltjes gisteren op mijn facebook pagina gepost en ik kreeg de vraag of ik alsjeblieft het recept wilde posten. Natuurlijk!

Mini ovenschaaltjes

200 gram aardapppelblokjes
4 grote tomaten (ontveld en in blokjes gesneden)
1 chorizo worst
250 gram ham reepjes
1 blikje (200 gr) doperwtjes
vier plakjes ontbijtspek
vier eieren
2 uien

4 ovenschaaltjes

Verwarm de oven voor op 180 graden Celsius.
Fruit de gesnipperde uit en voeg de hamreepjes toe. Bak deze een paar minuten mee.
Voeg de aardappelblokjes, de tomaten en de chorizo toe aan het ham/ui mengsel en bak mee. Laat het meeste vocht verdampen.
Voeg de doperwtjes toe, zout en peper naar smaak. Ik vind het lekker om tijm/rozemarijn/basilicum toe te voegen.
Meng alles goed door elkaar en verdeel over de vier schaaltjes.
Leg er een een plakje ontbijtspek over en breek het ei erboven.
Stop de schaaltjes in de oven en laat ongeveer 15 minuten bakken tot het ei gestold is.

Eet smakelijk!

maandag 16 december 2013

~ Monday Music ~

One of the most epic video's made!! I just love this song, it really picks me up :)


zondag 15 december 2013

Stash Busting Project: Little Lady Cowl!


I finished Little Lady's new cowl this morning and I am so happy with it! It ate up all the purple and gray bits I had left in my stash. Little Lady wasn't keen on modelling the cowl, but I got a few nice pics anyway. It is a bit too big for her, but I hope she will get to wear it quite some time. The yarn is sturdy enough to withstand some rough play!

The pattern can be found on the blog of Mam'zelle Flo!

Vanochtend heb ik alle eindjes van de nieuwe col voor de kleine dame weggewerkt! Ik ben heel blij met het resultaat! Ik ben nu alle losse eindjes/enkele bol paars (Wibra) kwijt uit mijn voorraad. Heerlijk. De kleine dame was niet happig op poseren maar ik kreeg toch nog een paar mooie foto's. Ik denk dat ze er de komende jaren nog veel plezier van gaat hebben want hij is nog een tikkie te groot.

Het patroon is te vinden op de blog van Mam'zelle Flo!

vrijdag 13 december 2013

Learn to Crochet Tunisian Style: In the Round with Colour Changes


Missed a lesson? Here you can find the whole Tunisian crochet course!

Last week I showed you how to crochet in the round and make the left cozy. This week I am going to show you how to change colours and get a striped cozy!
This tutorial will be mostly the same as last week, but I will show you how to change yarns and how to deal with all those ends. If you want stripes of a single colour for the background and the vertical bars, make sure you have two balls of the same colour.

No ebook this time! This is a real tutorial.


 Pick colours that you like and look good together. I am going to use two colours in my stripes so I chose some colours form the  colour combination board on Pinterest. I am using Rowan cotton and a double ended hook size 6 mm. And a stitchmarker.


 Pick your glass jar for your cozy.


Make a chain that fits around your jar, sl st to close and be careful not to twist your stitches.


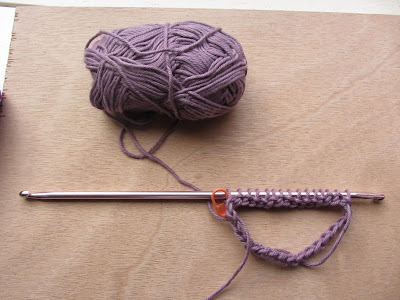
Mark your first stitch.


Pick up stitches like you would do for the foundation forward pass.


 If you have enough stitches on your needle, just flip it over and slide your work to the left, like you did last week!


Pick your colour for the return pass and pull through two loops.


Like this


Keep repeating this step until you have about four stitches left.


Flip it over!


Slide to the left, and go about with a forward pass again!


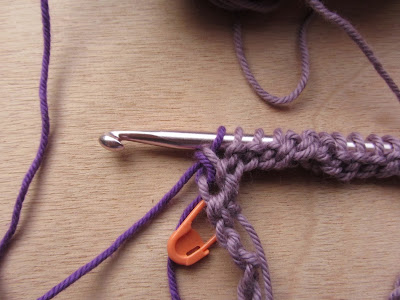
With this cozy I used the Tunisian Simple Stitch again, so when I arrive at my first loop I insert my hook from right to left underneath the front vertical bar and happily pick up more loops. And I reposition my stitchmarker. Make a stripe as wide as you like. Just keep on working those loops on your hook and off your hook.


But! I want to change colours. So I stop before my first stitch of the round I just made.


Pick two (or one, if you are making single colour stripes, make sure you have two balls of that colour).


Insert your hook in the first stitch, wrap your yarn over your hook for the forward pass in your new colour and pick up a loop.


Continue picking up loops with your new colour until you have enough stitches on your hook.


If you flip your work over to start a return pass, you need to change your colour in this pass as well. Finish your last two loops of your old forward pass colour.


Wrap your new return pass colour and pull through those two loops.


Now you can go on and make your return passes with your new colour!


Go on like this, make more stripes if you want to! The only downside is that you will have a shift in colours, the same as you would have with making a striped tube with single crochet stitches. I really do not know any solution for this, sorry!


To make your last finishing round you need to stop again in the stitch before your first stitch of that round. On the return pass keep working your loops off the hook until you have one loop left.

With your forward pass colour start making slip stitches along the round for the closing round and putting your hook into the stitches the TSS way. This method actually works better than the method I showed you last week!


And voila! Done! Enjoy your cozy!

Leer Tunisch Haken: In het Rond met Meer Kleuren


Lessen gemist? Hier kun je alles over Tunisch haken terugvinden!

Vorige week liet ik je zien hoe je in het rond Tunisch kon haken. Toen heb ik laten zien hoe je de linker pot cozy kon maken. Wat ik je deze week wil laten zien is hoe je tijdens je project kunt wisselen van kleur!
In principe zullen veel dingen hetzelfde zijn als vorige keer, maar het wisselen zelf zal ik proberen te verduidelijken. Als je strepen van 1 kleur wilt zul je voor iedere streep twee bollen van dezelfde kleur moeten gebruiken, maar de stappen om te wisselen zullen hetzelfde zijn.
Geen ebook dit keer, want het is echt een tutorial deze keer :)


 Kies een aantal kleuren die bij elkaar passen. Ik heb een bord met kleurpaletten op mijn Pinterest staan, en daar heb ik kleurpalet uitgekozen. Ik gebruik Rowan cotton en een tweezijdige haaknaald van 6 mm.


 En natuurlijk een pot waar de cozy om heen moet.


Maak een ketting van lossen die past om de pot.


Sluit deze en  markeer je lus op je naald als eerste steek.


Neem steken op zoals je zou doen bij een algemene heengaande toer.


 Heb je er genoeg, dan draai je je naald om en schuif je je werk naar links weet je nog?


Hecht dezelfde kleur of een andere kleur aan.


En begin een teruggaande toer.


Heb je ongeveer 4 steken over, dan draai je je naald weer om en ga je verder met je heengaande toer. Ga zo verder in een spiraal (zie ook hier) tot je een streep hebt van de juiste/gewenste dikte.


Bij deze cozy gebruikte ik weer de Gewone Tunische Steek dus bij de eerste steek stopte ik mijn naald achter de voorste lus langs en ging ik vrolijk verder met in het rond haken!


Maar! Nu wilde ik van kleur veranderen. Stop bij de eerste steek. Werk nog niet in een lus/draad/steek.


Kies twee (of 1 als je je strepen in 1 kleur maakt!) nieuwe kleuren. Eentje voor de heengaande toer en eentje voor de teruggaande toer.


Steek je naald in de eerste steek achter de verticale draad, maak een omslag met de nieuwe kleur en neem een lus op. Laat de oude kleur hangen (knip af tot een einde van ongeveer 15 cm.


Neem de lussen op en verplaats je stekenmarkeerder naar de eerste steek (de eerste lus van de nieuwe kleur).


Op de teruggaande toer moet je natuurlijk ook nog je kleur veranderen. Als je weer je werk hebt omgedraaid zorg je eerst dat je alle lussen van je oude eerste kleur hebt afgewerkt met de oude tweede kleur. Houd 1 lus oude kleur over.


Maak een omslag met je tweede nieuwe kleur (of dezelde kleur als je voor je heengaande toer hebt gebruikt).


Haal door twee lussen en ga zo door met je teruggaande toer tot je weer iets van 4 steken over hebt. Draai je werk weer om en ga dan door met de heengaande toer.

Op deze manier kun je dus strepen maken!


Het enige nadeel is dat je hetzelfde krijgt als je een spiraal maakt met alleen maar vasten: de kleur verschuift. Ik heb daar helaas geen oplossing voor!


Om de laatste afsluitende toer te doen zorg je ervoor dat je stopt met de heengaande toer voor de eerste steek van je toer, en 1 lus overhoudt na de terugaande toer.


Haal de kleur die je voor de verticale draden hebt gebruikt door je eerste steek (steek je naald in zoals je bij een Gewone Tunische steek zou doen) en lus en maak een afsluitende ronde door halve vasten door alle verticale draden te maken. Deze methode werkt eigenlijk beter dan die van vorige week!


En klaar! Draadje afhechten, wegstoppen en de cozy is gebruiksklaar!