Posts tonen met het label Lactosefree. Alle posts tonen

zaterdag 18 juli 2015

No-Dairy Week Day 4/5: Pasta Again!


En nog een keer pasta! De eerste keer woensdag was eigenlijk niet de bedoeling, want we zouden Kofta eten maar de mix was echt overal uitverkocht. Zo gek!
Deze keer maakte ik een witte saus met Alpro soja cuisine. Lekker gekruid met eigen kruiden en knoflook. Als vulling koos ik voor zalmsnippers (we willen namelijk vaker vis eten), mais uit blik, wat champignons en bosuitjes!

De man en kinders kregen er ook geraspte kaas over. Yum!

Vandaag gaan we BBQen bij vrienden dus ik denk dat ik melkvrij verder moet loslaten voor vanavond. Gelukkig heb ik speciale lactase pilletjes in huis en ga ik morgen weer verder met melkvrij eten.

xx
Barbara


~~~~~

Another pasta option! This time I made a white sauce with Alpro Soja Cuisine. This is a plant based cooking cream and I really like to use this as a base for any creamy sauce.
I spiced it up with dried herbs and garlic and added shredded salmon, corn, mushrooms and some onion.

The husband and kids got to add some shredded cheese. Yum!

I don't think I will get a dairy/lactose free dinner tonight as we are going to a BBQ with friends so I am putting in lactase enzyme pills in my purse. Just in case. And tomorrow I will go diary free again!

xx
Barbara

donderdag 16 juli 2015

No-Dairy Week Day 4: Pasta sauce


Sinds ik er achter kwam dat de meestje potjes en zakjes ook vaak melk bevatten, zijn de man en ik gaan experimenteren met zelf sausjes maken. Dit is onze standaard pasta saus, maar deze keer zonder  pesto.... Pesto blijkt dus ook vaak kaas te bevatten dus ik haalde onze grote pot kruiden erbij!

~~~~~

A few years afo, when I really started paying attention to what I was eating, we found out that lots of instant sauces contained milk in some kind of form. Since the we started making our sauces from scratch. In the pic you can see our usual pasta sauce but this time I left out the pesto.... I love pesto, but ours contains cheese so I did not use it this time. I did season the sauce, but with lots of dried herbs!

dinsdag 14 juli 2015

No-Diary Week Day 2: Muesli Breakfast


Heel simpel, heel lekker! Ik had nog wat aardbeitjes van gister over dus die gingen er lekker overheen. Op dit soort momenten ben ik blij dat er zoiets als Alpro soja bestaat. Toen ik begon met het lactosevrije dieet (na een bezoek aan de dietiste) was er nog niet zoveel, en nu wel! Ik had eerst keuze uit mini toetjes en wat zompige soja melk, maar nu is vooral de Alpro productenlijn enorm gegroeid en dat is superfijn.

Ontbijt: Alpro Mild & Creamy, AH Biologische muesli, aardbeien (compleet veganistisch)

~~~~~~~

Straigthforward, no nonsense, ubar yummy! I had a few leftover strawberries so I put them on top. When I started out with my lactose free diet there were only two brands of soy custard/yoghurt/drinks and I am really happy that they both expanded their horizons and put lots of other yummy products in their range. I do like Alpro more. They add calcium and vitamine B to their products, and that I like!

Breakfast: Alpro Soja Mild & Creamy, organic muesli (granola?), strawberries (completely vegan)

No-Dairy Week Day 3: Cookies!


Het leven is sneu zonder koekjes. Gelukkig bestaan er Punselie's! Melkvrij, notenvrij, eivrij. Superkoekjes dus voor degenen met een allergie/intolerantie. Ik sla even in voor deze week!

~~~~~~

Life sucks without cookies, right? Thank heaven for Punselie's! I think this is something rather typically Dutch as it is a kind of a "stroopwafel" but these cookies are perfect for anyone who is dealing with a nut-, milk- and egg allergy. Perfect. I am going to buy some more!

maandag 13 juli 2015

No-Dairy Week Day 1: Strawberry jelly


"een gezonde geest in een gezond lichaam"

Zowel mijn lichaam als geest heb ik een beetje verwaarloosd de afgelopen weken.. En helaas werden mijn opgeblazen buiken en pijn in mijn buik steeds freqeunter. Tijd om rust te nemen! Om het soort van te resetten ga ik compleet melkvrij in plaats van lactosevrij (ik ben lactose intolerant). Ik wil het wel een beetje leuk houden dus iedere dag post ik iets lekkers zonder melk!

Vandaag: jelly met aardbeien! Gewoon het pakje volgen, aardbeitjes schoonmaken en laten opstijven in de koelkast!

~~~~~~

"an healthy mind in a healthy body"

I've neglected both actually in the past few weeks and the effects were noticeably. My bloating symptoms and stomach cramps were bothering me more and more. It seemed to me I was getting more lactose intolerant than normal. Time to reset! I am cutting out all diary this week. And to keep up my spiritis I will post something diary free and yummy every day!

Today: Strawberry jelly pudding! Just follow the directions on the package, cut up strawberries and put in the fridge for a few hours! 

woensdag 28 januari 2015

Lactosefree Cooking: Overnight Oats


Vanochtend begon niet al te best: ik gleed van de onderste treden van de trap (en scoorde een tweetal blauwe plekken) en de stoppen sloegen door door het koffiezetapparaat. Aargh. Gelukkig kon ik mijn ontbijt zo uit de koelkast pakken! Sinds afgelopen weekend ben ik een nieuw ontbijt experiment begonnen nadat ik van een tweetal vriendinnen hoorde dat dit de perfecte oplossing was voor altijd-rennende-vliegende-nooit-tijd mensen. En altijd honger.
Nu heb ik dat zo vaak met mijn lesgeefdagen. Ik vlieg door de school en echt zitten is er niet bij. Dit ontbijtje zet je de avond ervoor in de koelkast en haalt het er 's ochtends uit.

Men neme:
6 eetlepels havervlokken
lactosevrije melk of amandelmelk of sojamelk
bevroren vruchtjes (bessen/aardbeien/frambozen)

Doe de havervlokken in een kom (of bakje of pot om mee te nemen)
Vul aan met melk tot het net onder staat.
Doe de bevroren vruchtjes er overheen.

Zet afgedekt in koelkast, laat het een nacht wellen en klaar!

Het is echt lekker!

Variatie tips die ik al wel gehoord heb maar nog moet proberen:

warm met een eetlepel pindakaas net voordat je het gaat eten en met banaan (klinkt heerlijk!)
met kaneel en appel ('s ochtends toegevoegd na het wellen)
een eetlepel chia zaadjes er door heen roeren voordat je het gaat eten
's ochtends verse vruchten toevoegen

Ik heb nog meer lactosevrije recepten hier staan, maar het moet nodig afgestoft worden! 

~~~~~~~~

This morning was not the best for me: I misstepped on the stairs and slided on my bum from the last four steps. Ouch! I think I have the bruises to show for it... Right after that electricity switched off after I turned on the coffee machine! I got that fixed and I was glad that the only thing I needed to do to really start my day was grab a bowl of oats out of the fridge. Aaaah bliss. After a few friends of mine were discussing overnight oats/oats breakfast as a great start of the day and a great way to not be hungry all the time I thought it would be worth a try. It's delish. It's easy. It's FAST. Never mind the always-on-a-hurry feeling, this will really cheer you up!

You'll need
6 tablespoons of oats
lactose free milk
frozen fruit
a bowl

Put the oats into the bowl.
Add milk until covered.
Add some frozen fruit (such as blueberries/strawberries/red berries)

Put cling wrap on top of it (or use a plastic bowl with lid if you want to take it along to work)
Put in fridge for the night and in the morning it is done! Nice soft oats and the taste of the fruits will be in the milk. Yum!

Variations I've head but not yet tried

warm with pieces of banana and a tablespoon of peanutbutter
with cinnamon and apple (add in the morning)
fresh fruit added just before eating
a tablespoon of chia seeds just before eating.


Gosh, it has been quite some time since my last lactose free recipe, but my intention is to keep it up and post more often!

donderdag 15 mei 2014

Rhubarb Pie!


This was my first time ever tasting rhubard and my very first time handling and cooking rhubarb!

And you know what? Definately not the last time. I think it's delicious and I am contemplating getting a rhubarb plant for my garden. Yum.

Here's what I did!

Ingredients/Ingredienten

100 grams all purpose flour / 100 gram tarwebloem
150 grams sugar / 150 gram suiker
1 table spoon caster sugar / 1 eetlepel lichtbruine basterdsuiker
500 grams rhubard cut into 2" pieces / 500 gram rabarber, in stukjes van 5 cm
70 grams pecan nuts chopped / 70 gram pecannootjes, gehakt in stukjes
150 grams of plant based butter / 150 gram wajang of andere plantaardige boter
1 teaspoon baking powder / 1 theelepel bakpoeder
3 eggs / 3 eieren.

Bring some water to a boil, cover the cut up rhubarb with boiling water and immediately drain.
Mix the butter and all the suger to a creamy like substance. Add one egg at a time and mix until you get a wet batter.
Stir the bakingpowder and all purpose flour and sift together in a seperate bowl, add the pecan nuts and mix with a spoon.
While mixing add the purpose/baking powder/pecan nuts slowly, bit by bit to the batter until you have a nice thick mixture.
Grease a pan, add batter, place rhubard on top and put it in an oven on 170 degrees Celsius for about 35 minutes.
That's it!

Breng water aan de kook en giet dit over de rabarber heen. Giet het ook meteen weer af.
Mix de boter en de suiker tot een piekig mengsel. Voeg daarna de eieren 1 voor 1 toe totdat je een nat beslag hebt.
Meng de bakpoeder met de bloem en zeef dit in een aparte kom, voeg de pecannootjes toe en meng.
Voeg al mixend beetje bij beetje het bloemmengsel toe aan het natte beslag tot je een mooi mengsel hebt. Schep het beslag in een ingevette springvorm en leg de rabarber er boven op. Afbakken op 170 graden, ongeveer 35 minuutjes.

En dat is alles!


Enjoy!


dinsdag 17 december 2013

Lactosefree/Lactosevrij: Mini oven dishes!


Hmmmmmmmmmmm yummy! I posted these on my Facebook page yesterday, and I had several requests for the recipe. As you wish :)

Mini oven dishes

200 grams of potato cubes
4 big tomatoes (skinned and chopped into pieces)
1 chorizo sausage (chopped up)
250 grams of ham strings
four slices of bacon (thin)
1 can of green peas (200 grams, 140 grams when drained)
4 eggs
2 onions (chopped up)

4 ovendishes

Preheat your oven to 180 degrees Celsius or 
Fry the onions in a pan and add the ham slices and fry for a few minutes.
Add the potato cubes, chorizo, tomatoes to the ham/onion mixture and let most of the moisture evaporate.
Add the green peas, salt and pepper to taste. I like to add some italian herbs to this recipe.
Stir everything wel and divide over the four oven dishes.
Add a slice of bacon and put the egg on top of it.
Put in the oven until your egg is nicely cooked (it took about 15 minutes for me).

Bon Appetit!

Hmmmmmmmm ik had deze mini ovenschaaltjes gisteren op mijn facebook pagina gepost en ik kreeg de vraag of ik alsjeblieft het recept wilde posten. Natuurlijk!

Mini ovenschaaltjes

200 gram aardapppelblokjes
4 grote tomaten (ontveld en in blokjes gesneden)
1 chorizo worst
250 gram ham reepjes
1 blikje (200 gr) doperwtjes
vier plakjes ontbijtspek
vier eieren
2 uien

4 ovenschaaltjes

Verwarm de oven voor op 180 graden Celsius.
Fruit de gesnipperde uit en voeg de hamreepjes toe. Bak deze een paar minuten mee.
Voeg de aardappelblokjes, de tomaten en de chorizo toe aan het ham/ui mengsel en bak mee. Laat het meeste vocht verdampen.
Voeg de doperwtjes toe, zout en peper naar smaak. Ik vind het lekker om tijm/rozemarijn/basilicum toe te voegen.
Meng alles goed door elkaar en verdeel over de vier schaaltjes.
Leg er een een plakje ontbijtspek over en breek het ei erboven.
Stop de schaaltjes in de oven en laat ongeveer 15 minuten bakken tot het ei gestold is.

Eet smakelijk!

woensdag 23 oktober 2013

Lactosefree Cooking: Brussels Sprout Pie / Spruitjestaart


 After posting this picture on my Facebook page I had a request for the recipe of the sprout pie I was going to make with these lovely sprouts!
Here it is, in lactose free form, in both English and Dutch. If there is no need to make it lactose free, just use normal cooking cream.
Nadat ik bovenstaande foto had geplaatst op mijn facebook pagina kreeg ik het vriendelijke verzoek of ik het recept voor spruitjestaart wilde plaatsen. Bij deze!

Here we go!

Ingredients
750 grams of Brussels sprouts (cleaned and cut at the bottom)
8 pieces of puff pastry
100 grams of pecan nuts
200 grams of bacon bits (squares)
100 grams of grated cheese (Gouda)
25 grams of butter
1 onion, chopped
salt, pepper, nutmeg
4 eggs (3 works fine too)
200 ml/250 ml of Soja Cuisine cooking cream
Spring cake tin

Preheat the oven at 200 degrees Celsius. Clean the sprouts and cook them for 4 minutes in boiling water. Pour off the water and cut big sprouts into halves if necessary. Peel the onion and chop into small pieces. Defrost the pieces of puff pastry until they are pliable. Chop up the pecan nuts (not too small). Spread the puff pastry pieces evenly over your spring cake tin. Use your fingers and thumbs to press them together and close off holes between the pieces. Prick a few tiny holes in the bottom puff pastry layer with a fork (this will make it more airy).
Take a pan and fry the onion with the small bacon bits for about 2 minutes in hot butter. Stir in the nuts and the Brussels sprouts and add salt, pepper and nutmeg to taste.
In a bowl, whisk together the eggs, add the Soja Cuisine and some Italian herbs and a bit of cheese.
Spread out the sprouts/nuts/onion mixture over your puff pastry, sprinkle the rest of the grated cheese over the sprouts and pour the egg/cream mixture over it.
Bake the pie for about 35-40 minutes.


Spruitjestaart

Ingredienten
750 gram spruitjes (schoongemaakt)
8 lapjes bladerdeeg
100 gram walnoten/pecannoten
200 gram magere spekblokjes
100 gram geraspte kaas
25 gram boter
1 ui
peper, zout, nootmuskaat
4 eieren (3 eieren gaat ook prima)
2 deciliter kookroom of Soja Cuisine (een heel pakje gaat ook best!)
Springvorm

Verwarm de oven voor op 200 graden Celsius. Maak de spruitjes schoon en kook ze 4 minuten in water met zout. Giet ze af en spoel er koud water over. Laat ze goed uitlekken en halveer grote spruiten. Pel de ui en snipper deze. Laat de deeglapjes ontdooien. Hak de noten grof. Bekleed de licht ingevette vorm met de lapjes bladerdeeg. Druk de randen van het deeg met duim en wijsvinger tegen elkaar. Prik in de bodem hier en daar gaatjes me teen vork. Fruit de ui met de spekblokjes 2 minuten in de hete boter. Schep de noten en het ui/spekmengsel door de spruitjes en voeg peper, zout en nootmuskaat naar smaak toe. Klop de eieren los met de kookroom. Schep het spruitjesmengsel op het deeg in de vorm. Verdeel de geraspte kaas erover en giet het ei/roommengsel erop. Baktijd in een voorverwarmde oven op 200 graden gedurende 40-45 minuten.

Bon Appetit!


dinsdag 2 april 2013

Lactose Free Cooking: Kladdkake, or Swedish Chocolate Cake

This is a recipe to my heart.

Just throw everything together, mix and bake!

When I saw this recipe over at Cookie Cottage I knew I had to make it. Hazel, the writer behind Cookie Cottage sometimes posts gluten free and/or lactose free recipes that cause my heart to jump with joy!

I love lactose free recipes!


And the cake itself? Mushy and very chocolatey. Divine.

Here is the translated recipe in metric:


Kladdkake

Ingredients

100 grams of plantbased margarine/butter
160 grams granulated sugar
60 grams all purpose flour
50 grams of cacao powder
1 sachet vanilla sugar
2 eggs


Preparation

Preheat the oven to 175 degrees Celsius. Grease and line an 18 cm diameter round baking tin with baking paper (I used my brownie pan). Sprinkle with cacao powder.

Sift the all purpose flour and the cacoa powder above a mixing bowl. Add sugar and stir the eggs one at a time through the dry ingredients until it is thoroughly blended. No lumps!

Add the melted butter and stir. Transfer the batter immediately into the baking tin/brownie pan.

Bake the cake until the top is a bit crunchy and the cake does not move when given a shake. It is probably done after about 20 minutes.


The top is lovely crunchy and the middle is a bit soft. Next time I think I will substitute the butter for safflower oil to see if it is a bit softer and even more easy to make!

Serve when it is properly cooled.

Have fun with the recipe!

woensdag 27 maart 2013

Lactosefree Cooking: Cinnabun Cinnamon Rolls!


Did you see my message about these Cinnabun Cinnamon Rolls? Did you also read that I thought they were absolutely divine?

I was not joking! They are extremely yummy.


With the help of a few lactosefree ingredients I was able to make them. To be honest with you, I did not make it absolutely lactosefree (I used goat milk instead of buttermilk), so if you are really really lactose intolerant, use soy or rice based milk.


Here it is, exactly how I have done it (this recipe is based on these Cinnabun Cinnamon Rolls and these Raspberry Swirl Rolls )

Lactose free (or reduced) Cinnabun Cinnamon Rolls

Cinnabun Cinnamon Rolls dough
180 ml warm water
2 1/4 teaspoons of active dry yeast
100 grams granulated sugar
1 teaspoon salt
60 ml goat milk/soy milk
1 egg
80 ml vegetable oil (I used sunflower oil)
500-550 grams of all purpose flour

Filling
113 grams of plant based butter, softened
275 grams light brown sugar
2 1/2 tablespoons of ground cinnamon
2 tablespoons cornstarch

Glazing
95 gram confectioners sugar
3 tbs plant based butter, melted
1.5 tbs Soya Cuisine or Bio Avena Cuisine (see pic)

Topping
Soya Creamy

I give a quote with a few adjustments for this recipe:

Making the Dough- In the bowl of a stand mixer fitted with a dough hook, pour in water, yeast and 1 tablespoon of the granulated sugar. Stir and proof 5 minutes. Once mixture looks bubbly and frothy, pour in remaining sugar and salt. Stir on low for 15-20 seconds. In a small bowl, measure buttermilk  goat milk, oil and egg. Whisk ingredients together until egg is incorporated to other two ingredients. Pour contents into the water and yeast mixture. Stir another 20 seconds in the mixer. Pour 250 grams of flour into mixer and stir on low until incorporated. Sprinkle flour in by 30 grams increments until dough cleans the sides and bottom of the bowl. Dough should be sticky but not sticky enough to stick to your hands when touched. Once it has reached this stage, turn mixer on and knead for 5 minutes. Remove dough from bowl, grease and replace back into same mixing bowl {since it's practically clean anyways.} Cover with plastic wrap and a dish towel. Rise 1-2 hours or until dough has doubled in size.
Filling and Cutting Rolls- In a medium size bowl, stir brown sugar, cinnamon and cornstarch together until combined. Set aside. Punch down dough. Flour a large clean table liberally with flour. Lightly flour dough as well. Roll dough out to be a 20x30 rectangle {or as close to that as possible} while moving dough around to ensure it's not sticking to your work surface. If it's a little short or uneven, feel free to cut off the edges to even it all out. {FYI-I cut off some dough on one side and filled in a spot that needed more dough on the other side to make a more even rectangle.} Spread softened margarine plant based butter over dough, being sure to go right to the edges leaving a 1-inch strip untouched on one of the longer sides of dough. Dump brown sugar mixture onto the middle of the dough and spread with your hands, creating an even layer over top of the margarine, still leaving that 1-inch strip of dough untouched. If you have any filling that falls off the sides of the dough, use a bench scraper to replace. Lightly press the sugar mixture into the margarine using a rolling pin. Roll the dough up into a tight log, finishing with the plain dough on the bottom to seal the entire thing together. Cut off the uneven ends to even out the log. Score log every 2 inches and then slice your rolls using those marks. Place into parchment paper lined, margarine greased pans. 12 into a 9x13, 3 remaining into a loaf pan, or 8x8 with the small ends. Cover pans with plastic wrap and dish towels. Let rolls rise another 1-2 hours or until they are touching and have risen almost double. My rolls always spread out more than up, so just be aware that they will most likely spread out more than up. Bake in a preheated 350 degree 175 degrees Celsius for 17 minutes, or until tops start to brown. Watch them carefully!!
Now onto the glazing:

Melt the butter into a small pan. Add the confectioners sugar and the soy/rice cuisine cream to the butter and stir well. Pour warm over the cinnabun cinnamon rolls when they are fresh out of the oven and let cool a bit.
Finally, wisk the Soya Creamy to a fluffy consistency (you need to be able to hold the bowl upside down without the cream falling out) and serve next to or on top of the Cinnabun Cinnamon Rolls!

Bon Appetit!


dinsdag 5 februari 2013

Unpinned: Molasses Crinkles


A few weeks ago it was a perfect bake-some-cookies-day. A grey Sunday afternoon is perfect for baking!
This recipe was burning in my eyes for a few weeks because I had a jar of molassas sitting in my cupboard for ages. I had to do something with it! I really like molassas, but I do not like it to sweeten my bread or coffee. It needs to be used as an ingredient. I like gingerbread cookies, but find making them time consuming, so finding the Molassas Crinkle Cookies was a win-win situation.


I kid you not. These are evil cookies. Absolutely delicious. Way to tempting. Munchy crunchy spicy. They were absolutely perfect!
The taste is something you like or not. Big Man decided he did not care for these cookies. Little Man was undecided and Little Lady also did not like them. "Unfortunately" this meant there were lots of cookies for me!


The recipe itself is perfect, the only thing I would change is the amount of sugar used for dipping the cookie balls in before you bake them. It is a lot! You can easily get away with 1/4-1/3 cup of sugar.

Molassas Crinkles (Culinary concoctions by Peabody)
(In metric)

150 grams granulated sugar, plus 100 grams for dipping (I recommend to use less, start with 50 grams)
281 grams all-purpose flour
1 tsp baking soda
1/4 tsp salt
1 1/2 tsp ground cinnamon
1 1/2 tsp ground ginger
1/2 tsp ground cloves
1/4 tsp ground allspice
170 grams unsalted butter, softened but still cool (I use plantbased margarine)
 63 grams packed brown sugar
1 large egg yolk
1 tsp vanilla extract
155 grams light or dark molasses (available at a whole foods store)

Preheat oven to 190 degrees Celsius
Whisk flour, baking soda, salt, and spices in a medium bowl until thoroughly combined; set aside.
In another bowl, beat butter and with brown and granulated sugar till light, creamy and fluffy. Add yolk and vanilla and beat till it is incorporated. Add molassas and mix till it is all incorporated (it will be a beige brown mixture). Add flour mixture slowly and mix till it is just all combined. With a spatula, check underneath the dough if all flour is incorporated. Give it a last stir. Dough is soft and a bit sticky. Take a tablespoon and make balls with tablespoons full of dough. Roll them nice and round with your hands (quickly!) and dip them in the remaining sugar. Place balls on a baking tin lined with parchment and bake them in the oven for about 11-13 minutes. I like them crunchy so I baked them for 13 minutes. Remove cookies after baking and let them cool on a wire rack.
Makes 25 cookies

donderdag 24 januari 2013

Lactosefree Cooking: Best Tomatosoup Ever


We really like soup. Really really like soup! Especially with this cold weather, there is nothing more delicious than a steaming cup of soup to warm your hands with. Over the years we have learnt several recipes to make soup from scratch, and it is so much better than soup from a can or a bag. Lots and lots better, more flavours, more bite. Absolutely love homemade soup! Most of time we have leftovers and it is great to put it in the freezer for another occasion.

This is the only soup Little Man will eat. If we have an other type of soup he wil dip a bit of bread in it, but this is really his favorite. He absolutely loves it. He empties his bowl to the last drop!

Making the soup will take some time, about 45 minutes to an hour. It is absolutely worth the effort.

So, here is the recipe!

Tomato soup from scratch


Serves 4 adults (about 6-7 bowls)
 
You'll need:
1 kg fresh tomatoes
1 liter of water
1 little can of tomato paste (70 grams)
2 onions
2-3 parts of garlic
3 bouillon tablets ( garden herbs) (broth tablets is the right translation I think!)
250 grams of soup meat balls
1/2 cup (or as much as you wish) vermicelli
laurel leaves
kitchen herbs
all purpose flour
fresh parsley (optional)

2 pans (one big, one small)
immersion hand blender

(We always eat french bread and camembert with soup)

Preparation

Take the small pan, fill halfway with water and bring to a boil.


Take your tomatoes and make a cross with a knife in the skin of the tomato. You want to remove all the skin so that the whole tomato will become soft for the soup.


Put your tomatoes for about 20-30 in the boiling water or until the skin becomes loose.

Remove tomatoes from the boiling water, remove skin and cut into pieces. Do not throw away the water when you are finished!


Pour about two tablespoons of olive oil in the big pan and put in your pieces of garlic and onion (cut into little pieces). Stir and fry. Empty the can of tomato paste into the pan, stir well. Take a tablespoon and add three tablespoons of all purpose flour into the tomato paste, stirring well after each tablespoon. You will get a thick gooey tomato paste/garlic/onion mixture.

With the water you used for the tomatoes, measure 1 litre in a measuring jug and add the three bouillon tablets, stir. Pour in about 400 ml into the big pan in little bits, stirring after each addition. You will get a nice tomato sauce with no flour clumps. Put in the cut up tomatoes and the rest of the bouillon. If you want a thinner soup add about 1.5 litre. Put in two laurel leaves and a bit of your kitchen herbs, as much as you like!

Cover the soup, bring to a boil and let simmer for about 15 minutes.


Remove laurel leaves and use your immersion blender to chop up all the pieces and make a nice soup.


Add the meatballs and vermicelli (and a bit of snipped fresh parsley if you like), bring the soup to a boil again and let it simmer for another 15 minutes. During that time heat up the oven and put in your french bread.

After these 15 minutes, serve your steaming soup in a nice bowl. Divide the french bread and enjoy with a nice piece of camembert or another type of cheese.


Bon Appetit!

maandag 21 januari 2013

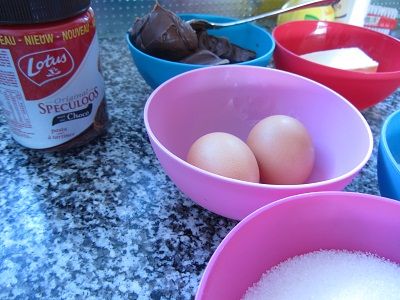
Unpinned: Choco Speculoos (Biscoff) Brownies

Over a week ago I went grocery shopping at the Jumbo. Not my normal supermarket, so I looked at a lot of new products.

One of the things I took home is Crisco. Read a lot about it, but did not know where to find it! Now I can try to make another version of creme au beurre for pies.

Also, one product I took home was Alpro Soja Whipped Cream. Yes you read it right: whipped cream. Finally I can indulge in whipped cream! You have to whip it up yourself but it gives a nice, firm whipped cream which is actually delicious. Yay!


And last but not least: Choco Speculoos. Normally choco paste or anything Nutella-like is out of the question for me becaus it always contain diary in some sort of way. Milk proteins, milk powder, pure lactose, you name it. There are alternatives with carobe, but it doesn't taste the same.

But the label on the jar only said: "Made in factories where also nuts and milk is used" (I hope I translated it correctly).

If I see this sentence I know I can try it. I am a bit weary about products on which the label says "May contain traces of milk", but the sentence on Choco Speculoos I mostly trust. If you are extremely lactose intolerant I would not recommend, then I would recommend to buy an alternative at the whole food store!

What I really wanted to do was make some brownies. I already knew that speculoos (or Biscoff as it is known in the US) can be used for pie, and I found some recipes for speculoos brownies.

But this was CHOCO speculoos, so I went off and found a recipe for Nutella Brownies which I pinned on my Cooking board.

Tried and tested now!

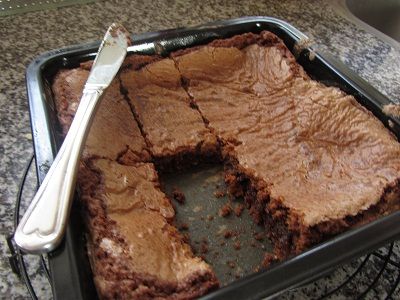
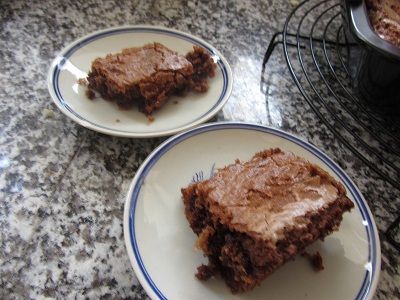
I had to alter the recipe a bit, but what came out of the oven was a nice light brown cake-like product.


You have to know, I have almost zero experience with brownies (because of the lactose tolerance) and when I tasted it I really had to think about how it tasted. It is chewy, a bit crunchy, a bit teeth-sticking sweet cake. And since it is Choco-speculoos it has a bit of a nutty flavour.
After four pieces I decided I like it. It is different! Big Man was a bit more negative as he absolutely loves brownies. I think if I would give it a star-rating it would get 3 out of 5 stars. Not uberly extremely good, but good.


Here is the recipe, have fun and let me know how your Choco Speculoos Brownies taste!

75 gram all purpose flour (I used self raising flour, it gives a bit more airy brownies I think)
220 grams of sugar
280 grams of choco speculoos
75 grams plant based butter
2 eggs
1 teaspoon vanilla

Follow the recipe for the Nutella Brownies:

Preheat oven to 350 degrees (that is 175 degrees Celsius!).
  1. In a small bowl combine flour and salt and set aside.
  2. Using an electric mixer blend butter until light and fluffy. Mix in sugar, eggs, vanilla and mix well followed by Nutella and stir until mixture is creamy. Stir in flour mixture.
  3. Pour into a greased 8-inch square brownie pan and bake for 30-37 minutes. Cool pan on wire rack.

vrijdag 4 januari 2013

Unpinned: One Pound Cake

I am pinning away most of the days on Pinterest, but recently I got the feeling: "If you are only pinning, what is the purpose of Pinterest anyway compared to bookmarking?""

Ofcourse Pinterest is more organized with the boards you can make and the sharing you can do is a plus, but if you don't unpin what is the purpose of all your pins?

So, I will start a new regular feature on the blog. I've started with it already last week with making Christmas cookies, but not in seperate blogposts. I think it would be fun to regularly unpin a pin with whatever craft featured!

Today's "Unpinned" will be Pioneer Woman's One Pound cake which can also be found along with other unpinned recipes on my "Tried & tested - Cooking Recipes" board on my Pinterest wall.

After yesterday's news I had the urge to bake something and this pound cake made with Sprite (why on Earth?) was on my list to make someday. The recipe itself is very easy!

What I will do is not give you a replica of the recipe, but I thought it would be nice to give the metric version of the ingredients list. I always cook American recipes with Google answers next to me while measuring all the ingredients!

And what was the result?


A soft, slightly crumbly, slightly moist pound cake. Absolutely divine!!! I really recommend this recipe. I did substitute some ingredients so it is probably a bit different in taste than the original pound cake.

Here's what I used:

339 grams of soft butter (plantbased)
600 grams of sugar (I used 50 grams of normal sugar, 550 grams of light brown sugar)
5 medium eggs
1 teaspoon vanilla flavour
2 big teaspoons "Baukje citroenrasp" or lemon zest in English (I hope it is the same!)
375 grams of all purpose flour
250 ml Sprite

Here is the original recipe. The oven temperature in Celsius is 165 degrees.

Preheat oven to 325 degrees.
Cream butter. Add sugar, 1 cup at a time, mixing after each addition. Add eggs, 1 at a time, mixing after each addition. Add butter and lemon extracts and mix well. Add flour, 1 cup at a time, mixing well after each addition. Add soft drink, then mix together until combined. Scrape sides of bowl, then mix briefly.
Pour into a greased Bundt pan and bake for 1 hour to 1 hour 10 minutes, until the cake is no longer jiggly.
Remove cake from oven and invert pan until cake drops out. Slice and chow down!

Have fun with the recipe!

zondag 23 december 2012

Lactosefree: (Christmas) Mini Apple Pie Cupcakes


I was in a cupcake making mood for about two days already, but yesterday Big Man went shopping with Little Lady, so Little Man and I had some time to spend in the kitchen.

I have made Nigella Lawsons Cupcakes before, but I was hit with some kind of cooking creativity spark and I thought it would be nice to make mini apple pie cupcakes.

So here's what I did:

Mini Apple Pie Cupcakes (based on Nigella Lawsons cupcakes)

Makes 12 cupcakes 
  • 125 gram(s) self-raising flour
  • 125 gram(s) sugar 
  • 1 package vanilla sugar
  • 125 gram(s) unsalted butter soft (Wajang)
  • 2 medium egg(s)
  • 1 teaspoon(s) vanilla extract
  • 2 tablespoon(s) milk 
  •  3/4 of a big apple (I used a Kanzi apple) cut into small pieces (not grated, but really small cubes)
  •  about 100 gr raisins, well in warm water before use
  • 1 big tablespoon cinnamon
Preheat oven on 200 degrees Celsius. Mix butter and sugar until smooth, beat in one egg at a time. Add a bit of flour and the vanilla extract. Mix with the rest of the flour (I just put all of it together and mixed it well). Add milk and mix till blended. Add cinnamon to bowl of cubes of apple and stir till blended. Put both apple cubes and raisins into the batter and stir untill it is all evenly distributed. Place paper cups into a cupcake tin and divide the batter evenly into the paper cups.

Place in the oven for about 15-20 minutes until golden brown.

I made water glazing with water and powdered sugar. Just start with a tablespoon or two of water and add powdered sugar until you have a Nutella like consistency. Put glazing (or not, they are delicious on their own) on top of the cupcakes and give the sprinkles to your kids! You can add food coloring to the water glazing if you wish.

They were absolutely delicious!!! Soft, crumbly with a sweet bite from both the apple and the raisins. This is a keeper!

I originally wanted to make a whipped coconut cream topping according to a recipe I found on Pinterest, and I found a great tutorial how to make it, but I bought the wrong can of coconut milk. It has to be a can without stabilizers or additives. It completely failed! To be continued....


woensdag 28 november 2012

Lactosefree Cooking: Hmmmmm Pumpkin Cookies!

Over the past few weeks I have been pinning like mad on Pinterest, but I am getting the feeling I really need to do something with my pins.

I had lots of recipes. Most of them are cookies and pies. I just love them. Easy to make, delicious to eat!

During Autumn season I have a soft spot pumpkin. Eating pumpkin is not really very Dutch, but pumpkin soup is getting more normal nowadays it seems. Typically American bites such as pumpkin pie and pumpkin cookies are not part of the normal Dutch kitchen.

I knew some pumpkin recipes, and I make pumpkin soup for years and years, but I did not know how to work with pumpkin for sweet treats such as pie. We do not have the tins with pumpkin puree ready-to-go, only fresh pumpkins are available in the store.

Last year I made pumpkin pie from a Dutch recipe for the first time and it was a winner. And after making that pie I knew how to make pumpkin puree from a fresh pumpkin, so this year I was really eyeing and drooling on the pins with pumpkin pie and pumpkin cookies.

Last Sunday was the day.

I made these : *click*

Absolutely delicious.......


This recipe is "double" lactosefree. I used ricemilk chocolate and plant based butter for these cookies.

First of all, get a pumpkin. The recipe calls for a can of pumpkin puree, but this is how you make fresh pumpkin puree:

Clean your pumpkin by removing the skin and seeds, and cut it up in pieces
Lay the pieces on a baking tray (covered with baking paper) and drizzle some olive oil over the pieces
Grill the pumpkin in a preheated oven (190 degrees Celsius) for about 35 minutes
Mash the pieces to make puree

Now, for the cookies I converted the measurements to the metric system and used some other stuff than called for in the recipe:

You'll need
280 grams all purpose flour
227 grams butter
200 grams sugar
425 grams pumpkin puree (buy a small one)
2 eggs
1.5 tsp pumpkin pie spice (a mixture of 1.5 tsp cinnamon, 0.5 tsp nutmeg, 0.25 tsp cloves and 0.5 tsp ginger)
1 tsp baking powder
0.5 tsp baking soda
0.5 tsp salt
1 tsp vanilla extract
1.5 chocolate bars, grated (I used Maitre Mathis from Albert Heijn and Bonvita from the reform shop)

Follow the recipe and bake the cookies at 190 degrees Celsius.

Here is the recipe in short, I did not do the glazing:

COMBINE flour, pumpkin pie spice, baking powder, baking soda and salt in medium bowl. Beat butter and sugar in large mixer bowl until creamy. Beat in pumpkin, eggs and vanilla extract. Gradually beat in flour mixture. Stir in morsels and nuts. Drop by rounded tablespoon onto prepared baking sheets.

BAKE for 15 to 20 minutes or until edges are lightly browned. Cool on baking sheets for 2 minutes; remove to wire racks to cool completely. Drizzle or spread with Vanilla Glaze.

These cookies are a bit cake like, a bit spongy, a little bit sweet and I love love love the bits of chocolate in these.

I can really recommend them!


maandag 5 november 2012

Lactosefree Cooking: Peanut Butter Cookies


Peanut Butter Cookies! I bought the real US creamy kind of peanut butter a while ago, but it stood in the cupboard unused. It was time to do something with it! I already found the recipe, and this is so easy to make! I am making this post to help out my fellow Europeans, since the original recipe gives all amounts in cups.

You'll need:
100 grams of sugar
110 grams of brown sugar
113 grams of plant based margarine
150 grams of flour
130 grams of peanut butter
1 egg
3/4 tsp baking soda
1/2 tsp baking powder
1/4 tsp salt

Method

1 Beat the butter until creamy, 2 minutes. Add the sugars, beat for 2 more minutes. Mix in the peanut butter and egg. Mix together the dry ingredients - flour, baking soda, baking powder and salt. Stir the dry ingredients into the sugar butter mixture.
2 Wrap dough in plastic and refrigerate at least 3 hours.
3 Preheat oven to 375°F (or 190 degrees Celsius). Shape dough into 1 1/4 inch balls (or 3 cms). Place about 3 inches apart on ungreased cookie sheet. Flatten in crisscross pattern with a fork. Bake until light brown, 9 to 10 minutes. Cool on baking sheets for a minute; transfer to rack to cool completely.


You can make the balls immediately, but I would recommend putting the dough into the refridgerator for a while. It is such a sticky mixture, and you need it to be cool to make the balls for the cookies.


Hmmmm. They are so delicious! Keep them stored in a box, and they will stay nice.
Have fun baking them!